


6
CIRCUIT BREAKER
This battery charger has an internal self-resetting circuit breaker that protects the charger from temporary over-
loads. When it operates it makes a clicking sound. You will see the ammeter reduce to zero when the breaker is
open. After a cool-down period, the breaker will automatically close and the ammeter will show a high rate of
charge. If the breaker continues to cycle every few minutes, reduce charge rate or discontinue charging.
PRE-CHARGE ACTIVATION
CAUTION: Be aware that a fully charged battery will also cause a low Ammeter reading. Attempting pre-
charge activation of a fully charged battery may cause explosion - make sure that battery really is discharged,
before using this procedure.
Pre-charge activation is the term for the time it takes before a battery begins to accept a measurable rate of charge
- it can be as long as 4-8 hours from the time the charging process begins.
Pre-charge activation is indicated if the ammeter reading is zero and a hydrometer or voltmeter reading shows that
the battery is fully discharged.
NOTE: The newer, high-calcium-type 12 Volt DC batteries may need pre-charge activation if their charge has been
allowed to drop to a very low level. When deeply discharged, this type of battery will provide only a very low
voltage output and will draw less than 1 amp during the recharging process, until activated.
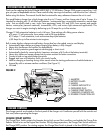
CHARGING IF BATTERY IS INSTALLED IN A VEHICLE
a) Set charger's Charge Rate Selector switch to appropriate setting according to battery size. Make sure the
Charge/Start switch is in the Charge position.
b) Check polarity of battery posts - For top-mounted battery connectors, the Positive post (marked POS, P, +)
usually has a larger diameter than the Negative battery post (marked NEG, N, -). For side-mounted battery
connectors, the terminals are marked Positive -red and Negative -black.
c)
Attach charger clamps to battery connections, as follows, ensuring a good connection (if there is a mistake,
the Reverse Polarity Indicator will light): NEGATIVE-GROUNDED VEHICLE: Connect the POSITIVE (RED)
charger clamp to the POSITIVE (POS, P, +) ungrounded battery terminal. Then, connect the NEGATIVE (BLACK)
charger clamp to the vehicle chassis, or the engine block (away from the battery). Do not connect the clamp to the
carburetor, fuel lines, or sheet-metal body parts: connect only to a heavy gauge metal part of the frame or engine
block. NOTE: NEGATIVE-GROUNDED type systems are the most common in today's vehicles.
POSITIVE-GROUNDED VEHICLE: Connect the NEGATIVE (BLACK) charger clamp to the NEGATIVE (NEG, N,
-) ungrounded battery post. Then, connect the POSITIVE (RED) battery clamp to the vehicle chassis or engine part
(away from the battery). Do not connect the clamp to the carburetor, fuel lines, or sheet-metal body parts: connect
only to a heavy gauge, stable metal part of the frame or engine block. NOTE: If there is any problem connecting
the charger clamps to the battery terminals, contact the Husky Technical Support Department toll-free at
(866) 584-5504 for assistance.
d) Plug battery charger power cord into grounded AC power outlet and refer to Appendix A at the end of this
document for approximate charging times.
e) When charging is completed, disconnect cables and clamps in reverse order from which they were connected.
NOTE: Use of Extension Cords
If it is necessary to use an extension cord, as is often the case, observe the following important safety information:
• Before using any extension cord, ensure that the wire size is at least 16 AWG for up to 100 feet and 14
AWG for longer than 100 feet.
• Use only a good quality, good condition, UL-approved extension cord, and ALWAYS connect charger to the
extension cord before plugging the extension cord into a 110/120 volt AC power outlet. The use of a poor
quality extension cord or one that is not in good repair could cause fire and/or electric shock.
• Use a three-wire extension cord with a 3-prong plug and 3-conductor socket.