


4
INTRODUCTION AND FEATURES
Thank you for selecting the Husky® Model HSK074HD 2/10/55 Battery Charger. With proper care and use, it will
give you years of dependable service. Please read all safety warnings and cautions, and this entire User's Manual,
before using this device. The manual should then be retained for easy reference whenever the unit is used.
This model battery charger has a high charge rate of up to 10 amps, and low charge rate of up to 2 amps. It is
intended for charging only 12 volt lead-acid batteries - maintenance-free, conventional automotive, marine deep
cycle - that are usually used in cars, trucks, farm equipment, boats, RVs and SUVs, lawn mowers and garden
tractors, motorcycles, personal watercraft, snowmobiles, ATVs, and various light commercial applications. This
charger can assist in engine starting by delivering up to 55 amps for up to five minutes.
Charges 12 Volt automotive batteries in only 4-6 hours. Three settings,with sliding power selector:
a) 2 amps: 12 volt motorcycle, lawn mower, and Jet Ski type batteries.
b) 10 amps: 12 volt automotive, truck and marine deep-cycle batteries.
c) 55 Amps for up to five minutes to start engines.
Built-in meter displays charge rate and battery charge level on color-coded, easy-to-read display.
• Automatically taper charges and stops charging when battery is fully charged
• Heavy-duty transformer and rectifier for dependability
• Built-in circuit protection guards against overcharging or short circuit
• Automatically checks for correct polarity (requires a minimum of 4.0 volts at the battery terminals)
• Heavy-duty cables and copper clamps are corrosion-resistant for better connections
• Connect to side–or top-mount battery terminals
• Rugged steel case with baked-on finish, plus sturdy handle
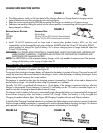
• Ideal for charging or boosting during winter season when the starting performance of vehicle batteries is
lowered by cold or extreme weather conditions. (See Figure 2.)
• UL-Listed
FIGURE 2
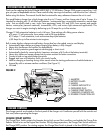
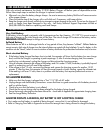
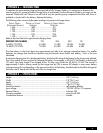
CHARGER CONTROLS
The charger controls are located on the front panel of the charger unit. Familiarize yourself with the controls and
their uses, before operating the charger.
CHARGE/START SWITCH
The Charge/Start Switch protects the Ammeter during high current Start conditions and enables the Charge Rate
Selector Switch to turn on the Engine Start function. During charge operations, the Charge/Start Switch must be in
the Charge (LEFT) position. For starting engines, the Charge/Start Switch is placed in the Start (RIGHT) position.
1. AMMETER
2. BATTERY CLAMPS
3. HANDLE
4. CHARGE RATE SWITCH
5. GROUNDED PLUG
6. CHARGE/START SWITCH
7. CHARGING COMPLETE LED
8. REVERSE CONNECTION LED
1
2
3
4
5
6
7
8