WIRING:
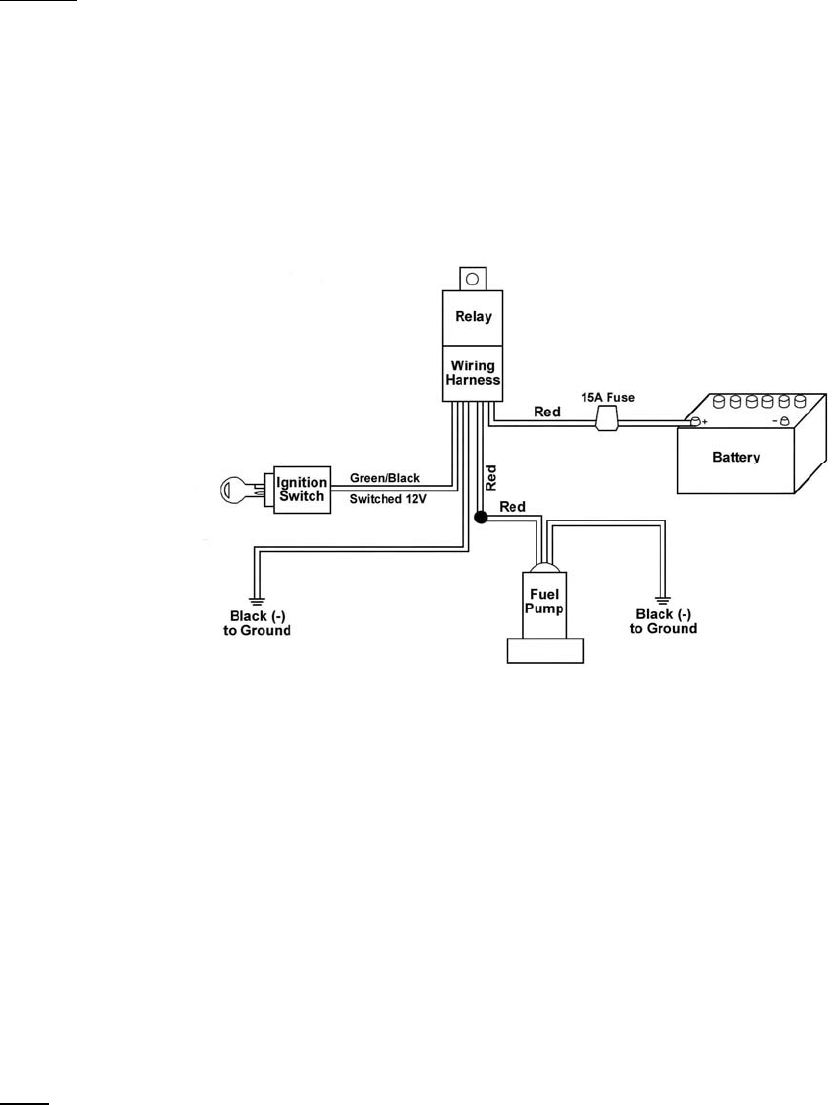
There are 2 methods to wire the pump: (1) To wire the fuel pump with a relay (2) To wire the fuel pump with an oil pressure safety switch.
(1) WIRING THE FUEL PUMP WITH A RELAY:
NOTE: You will need Holley Fuel pump relay kit P/N 12-753 or equivalent 4-wire relay.
1. Disconnect the cables from the battery.
2. Mount relay on firewall of engine compartment using a sheet metal screw.
WARNING
! Before punching or drilling a hole in the firewall, make sure you know what is on the other side to avoid puncturing
equipment such as heater cores, air-conditioning system equipment, hoses, or wiring.
3. Plug the fuel pump relay harness into the relay, until it locks into place.
4. Connect the black wire of the harness to ground using 12 gauge wire.
5. Connect the Green/Black wire to a switched 12V source.
6. Connect one of the red wires to the positive wire (red wire) of the fuel pump.
7. Attach the in-line fuse holder to the remaining red wire. After attaching the fuse holder, insert the 15A fuse and connect to the positive side
of the battery using 12 gauge wire.
8. Reconnect the battery cables.
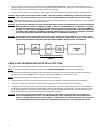
Figure 2
(2) WIRING THE FUEL PUMP WITH AN OIL PRESSURE SAFETY SWITCH:
One method is to wire the pump to a switched 12-volt source (providing power only when the engine is running) located at the vehicle’s electric
panel. To ensure this condition, the installation of a Holley 12-810 oil pressure safety switch is recommended for installation into the wiring
circuit. This will ensure that the pump will not continue to operate after the engine is shut off and/or when the key is left in the “ON” position. If
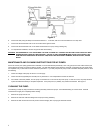
the pressure switch is to be used, follow the installation instructions as outlined below (refer to Figure 3). Use 12 gauge wire for power (BAT+)
and ground wires.
1. Disconnect the ground cable from the battery.
2. Remove the original equipment oil pressure switch and retain.
3. Screw a 1/8” pipe nipple into the hole from which the original pressure switch was removed. Use any suitable thread sealant on all fittings,
taking care to avoid any excess that might contaminate the engine.
4. Screw a 1/8” pipe tee onto the nipple and position it in a manner to facilitate the installation of the original oil pressure switch and the new
oil pressure safety switch in the remaining two holes.
5. Screw in the two switches and reconnect the lead to the original equipment oil pressure switch.
NOTE:
The pump oil pressure switch will normally have three terminals marked: C (common), NC (normally closed), and NO (normally open).
3


