


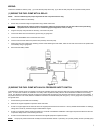
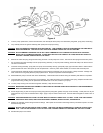
4. Connect the fuel line from the tank to the fuel filter and then to the inlet port of the pump. Connect the carburetor delivery line to the
outlet port of the pump and to the regulator (for the 12-150) located near the carburetor inlet. See Figure 1. The fuel pump inlet and outlet
ports take a 3/8” NPT fitting, therefore a 3/8” or larger fuel line is recommended.
5. Install the inlet filter screens with the fuel fittings. Teflon paste can be used on the fittings and torqued to 15 ft./lbs. See warning below.
WARNING!
DO NOT USE TEFLON TAPE ON PUMP FITTINGS. THIS TAPE CAN BREAK DOWN WHEN IT COMES IN CONTACT WITH
FUEL. THE TEFLON TAPE MAY PLUG THE FUEL PUMP, CAUSING DAMAGE TO THE PUMP AND THE FUEL SYSTEM.
NOTE:
Avoid unnecessary restrictions, such as sharp bends and undersized fuel fittings and hoses. Avoid routing fuel lines in areas that would
cause chafing. All fuel line connections must be leak proof.
WARNING!
IF SPLICING INTO EXISTING FUEL LINES, USE EXTREME CARE TO AVOID CONTAMINATING THE LINE WITH RUBBER OR
METAL SHAVINGS, AS THIS WILL DAMAGE THE PUMP. IF THE FUEL LINE HAS BEEN CUT, IT IS ESSENTIAL THAT IT BE
CLEANED TO ENSURE THAT NO METAL OR RUBBER PARTICLES ENTER THE FUEL SYSTEM. THIS IS PERFORMED BY
BLOWING THE LINE CLEAN WITH COMPRESSED AIR. HOLLEY DOES NOT RECOMMEND THE PROCEDURE WHERE THE
COIL WIRE IS DISCONNECTED, THE ENGINE IS CRANKED, AND THE FUEL IS COLLECTED IN A CONTAINER. SPARKING
CAN OCCUR DURING THIS PROCEDURE, WHICH MAY RESULT IN A FIRE AND/OR EXPLOSION.
WARNING!
DO NOT OVER TIGHTEN THE FITTINGS ON THE FUEL PUMP. TORQUE 3/8” NPT FITTINGS ONLY TO 15 FT/LBS. OVER
TIGHTENING OF THE FITTINGS CAN CAUSE THE PUMP BASE TO CRACK ALLOWING FUEL TO LEAK. A FUEL LEAK CAN
CAUSE A FIRE AND/OR EXPLOSION RESULTING IN PROPERTY DAMAGE, SERIOUS INJURY, AND/OR DEATH.
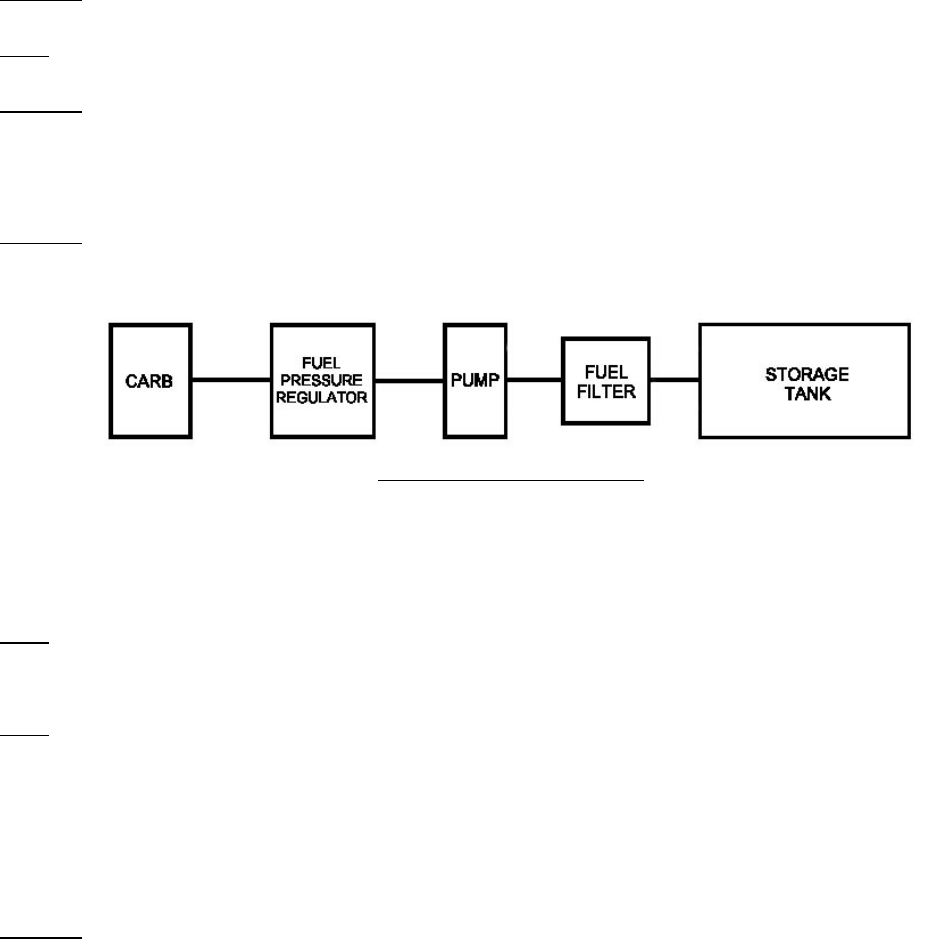
High Performance Fuel System
Figure 1
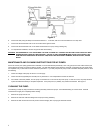
USING A FUEL PRESSURE REGULATOR WITH A FUEL PUMP:
If the pump is a high-pressure model, a pressure regulator must be installed in the line between the pump and the carburetor.
NOTE:
For optimum performance and precise fuel control, Holley ALWAYS RECOMMENDS using a Fuel Pressure Regulator.
1. Using the bracket supplied with the regulator, position the regulator as close to the carburetor as possible, taking care to minimize the
exposure to heat sources. DO NOT mount the regulator on the exhaust manifold or any extremely hot surface.
NOTE:
The fuel pressure regulator is included with the 12-150. Plug any unused ports.
2. Connect the fuel line from the “out” side of the pump to the “in” side on the regulator. All fuel line connections must be leakproof.
3. Connect the “out” side of the regulator to the fuel inlet on the carburetor(s). All fuel line connections must be leakproof.
4. The regulator comes from Holley with the regulator pressure preset at 6 psi. However, for individual requirements, it may be readjusted.
The pressure is increased by loosening the regulator locknut and turning the adjustment screw clock-wise. Decrease pressure by turning
the adjustment screw counter-clockwise. Pressure adjustments can only be made while the engine is running. Due to the high volume
design of these regulators, pressure settings may not be maintained with a zero flow.
WARNING!
IF YOU TURN THE ADJUSTMENT SCREW ALL THE WAY IN, IT WILL RESULT IN EXCESSIVE FUEL PRESSURE AND
CAUSE THE CARBURETOR TO FLOOD. A FLOODED CARB CAN CAUSE A FIRE AND/OR EXPLOSION, RESULTING IN
PROPERTY DAMAGE, SERIOUS INJURY, AND/OR DEATH. ALWAYS USE A FUEL PRESSURE GAUGE, SUCH AS HOLLEY
P/N 26-500 BETWEEN THE REGULATOR AND THE CARB(S) WHEN ADJUSTING THE FUEL PRESSURE REGULATOR.
2