


SKU 95621 Page 4
Unpacking
When unpacking, check to make sure all parts listed on Page 6 are included. If
any parts are missing or broken, please call Harbor Freight Tools at the number
on the cover of this manual.
Assembly
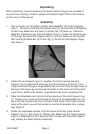
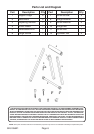
1. Use a wrench (not included) to fasten each Base Bar (2) to each Support
Leg (1). Do this by inserting the Cylinder Nut (12) into the hole at the bottom
of each Leg. Make sure the hole in Cylinder Nut (12) faces up. Place the
Base Bar (hole facing up) onto the Support Leg (1). Fasten the Small Screw
(7) through the hole in the Support Leg (1) so that it fastens to the Cylinder
Nut, locking the Base Bar (2) to the Leg (1). Do this for both Support Legs.
See Figure 1.
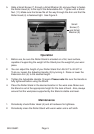
2. Fasten the two Support Legs (1) together. Do this by leaning the long
Support Leg (1) against the short Leg that has the frame at the top. Put a
Large Screw (6) through a Large Washer (8) and insert both through holes at
the top of the large Leg and through the holes on the outer part of the short
Leg’s frame. Fasten with another Large Washer (8) and a Large Nut (10).
3. Slide the Extendable Arm (5) into the top opening of the short Support Leg
(1). Please note, make sure the holes at the top of the Extendable Arm (5)
are at the top and face the front and back of the stand. If the holes face the
sides of the stand, you will not be able to lock the Extendable Arm in place.
See Figure 2.
4. Fasten the Adjustable Handle (3) to the frame at the top of the shorter
Support Leg (1). See Figure 2. Please note: Make sure the longer Support
Leg (1) is extended from the Stand so that it is level with the other Support
Leg, making the Roller Stand is balanced.
Support
Legs (1)
Base Bars (2)
Figure 1