


route suggestions or that you will receive the warning icons in
all cases. Limitations may exist in the map data such that your
device cannot account for these restrictions or road conditions
in all cases. Always defer to all posted road signs and road
conditions when making driving decisions.
1
Select Settings > RV Profile.
2
Select RV.
3
Select .
4
Follow the on-screen instructions.
Activating an RV Profile
Before you can activate a profile, you must add the profile
(page 1).
The device calculates routes based on the width, length, height,
weight, and other settings for the active profile.
1
Select Settings > RV Profile > RV.
2
Select the profile.
3
Select Select Profile.
Adjusting the Screen Brightness
1
Select Settings > Display > Brightness.
2
Use the slider bar to adjust the brightness.
Adjusting the Volume
1
Select Volume.
2
Select an option:
• Use the slider bar to adjust the volume.
• Select to mute the device.
• Select for additional options.
About Automatic Volume
On devices with hands-free calling, automatic volume allows the
device to adjust the volume level based on the background
noise in the vehicle (page 10).
Automatic volume control lowers the volume of the device when
background noise is low and raises the volume level when
background noise increases.
Enabling Automatic Volume
Your device can increase or decrease the volume automatically
based on the level of background noise.
1
Select Volume > .
2
If necessary, select Automatic Volume.
3
Select Enabled.
Status Bar Icons
The status bar is located at the top of the main menu. The
status bar icons display information about features on the
device. You can select some icons to change settings or view
additional information.
GPS signal status
Bluetooth
®
technology status (appears when Bluetooth is
enabled)
Transportation mode indicator
Current time
Battery status
Connected to Smartphone Link
Temperature
Viewing GPS Signal Status
Hold for three seconds.
Battery Information
After the device is connected to power, it begins to charge.
in the status bar indicates the status of the internal battery.
To increase the accuracy of the battery gauge, you should fully
discharge the battery and then fully charge it. Do not unplug the
device until it is fully charged.
Setting the Time
1
From the status bar, select the time.
2
Select an option:
• To set the time automatically using GPS information,
select Automatic.
• To set the time manually, drag the numbers up or down.
Using the On-Screen Buttons
• Select to return to the previous menu screen.
• Hold to quickly return to the main menu.
• Select or to see more choices.
• Hold or to scroll faster.
• Select to see a menu of options for the current screen.
Using the On-Screen Keyboard
See "Language and Keyboard Settings" to change the keyboard
layout (page 14).
• Select to delete a search entry.
• Select to delete a character.
• Select to change the keyboard language mode.
• Select to enter special characters, such as punctuation
marks.
• Select to change character capitalization.
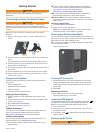
Using a Backup Camera
WARNING
Keep your eyes and mind on driving while using the backup
camera. Using a backup camera is an enhancement for safety
practices. The backup camera is not a replacement for driver
attentiveness and good judgment.
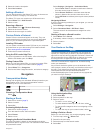
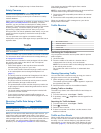
If a composite video backup camera has been installed in your
vehicle, you can view the output of the camera on your device.
1
If necessary, connect the camera to the video-in jack
À
on
the mount.
2
Select an option:
• If your camera is connected to your reverse lights, put
your vehicle in reverse.
• If your camera is connected to the vehicle battery, select
on the screen.
The camera output appears on the device screen.
2 Getting Started