


2-17
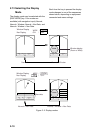
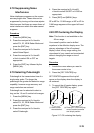
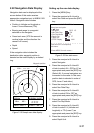
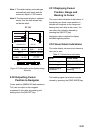
2.22 Navigation Data Display
Navigation data can be displayed at the
screen bottom if this radar receives
appropriate navigation input in NMEA 0183
format. Navigation data includes
• Position in latitude and longitude or
Loran-C time differences (TDs)
• Bearing and range to a waypoint
selected on the navigator
• Cross track error (XTE-the amount in
nautical miles and the direction the
vessel if off course)
• Depth
• Speed
If the navigation data includes the
destination data, waypoint position is
denoted on the radar display by a dashed
ring.
1.5
NM
0.5
HDG 326.8˚
66˚ 04. 00N
166˚ 04. 00E
VRM EBL + CURSOR
0.675
NM
240.1˚
R
0.646
NM
308.7˚
R
DEPTH XTE SPD
350.0m 0.05NML 30.0KT
WAYPOINT POSI L/L
1.8
NM
25˚
M
AUTO
Waypoint position
Figure 2-19 Sample nav data display
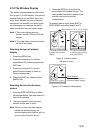
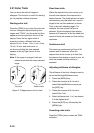
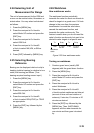
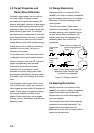
Setting up the nav data display
1. Press the [MENU] key.
2. Press the omnipad at 6 o’clock to
select Nav Data and press the [ENT]
key.
● NAV DATA MENU ●
Select item and option
by ▲▼ keys.
1. Navigator
2. Nav Data Disp
3. Pos Disp Mode
4. Depth Unit
5. Temp Unit
6. STBY Display
. . . . . . . . . . . . . . . . . . .
Press HM-OFF to temporarily
hide menu.
<Press MENU for main menu.>
ALL GPS LC
OFF ON
L/L TD
M FA FT
˚C ˚F
NORM NAV
Figure 2-20 Nav data menu
3. Press the omnipad at 6 o'clock to
select Navigator.
4. Press the omnipad at 3 o'clock/9
o'clock to select ALL, GPS or LC as
appropriate and press the [ENT] key.
(Select ALL if several navigators are
connected to the radar. In this case,
position data is selected in order of
GPS, Loran C and other.)
5. Press the omnipad at 6 o'clock to
select Nav Data Disp.
6. Press the omnipad at 3 o'clock/9
o'clock to select ON or OFF as
appropriate and press the [ENT] key.
7. Press the omnipad at 6 o'clock to
select Pos Disp Mode.
8. Press the omnipad at 3 o'clock/9
o'clock to select L/L (latitude and
longitude) or TD (Loran C) as
appropriate and press the [ENT] key.
9. Press the omnipad at 6 o'clock to
select Depth Unit.