


12
ASSEMBLY
G
B9785b-0920
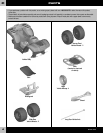
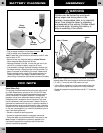
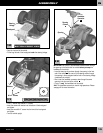
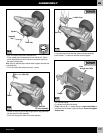
• Slide a large hubcap, indented side down, onto the long vehicle
rear axle.
• Slide a wide rear vehicle wheel (labeled R) onto the long vehicle
rear axle. Make sure the ribs on the wheel face up.
• Slide a rear wheel driver, ring side down, onto the long vehicle rear
axle. Fit the grooves on the rear wheel driver onto the ribs on the
wide rear vehicle wheel.
Large Hubcap
Indented Side Down
Long Vehicle
Rear Axle
Wide Rear
Vehicle Wheel
Ribs Face Up
Rear Wheel Driver
Ring Side Down
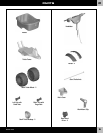
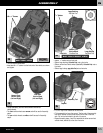
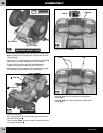
• Face the rear of the vehicle.
• Insert the vehicle rear axle assembly into the hole in the rear of the
vehicle. Make sure the rear wheel driver fits onto the pins in the
motor assembly.
Pins in Motor
Assembly
Vehicle Rear Axle
Assembly
6
7
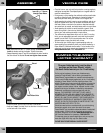
BOTTOM REAR VIEW
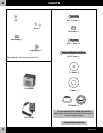
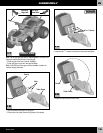
• Slide a rear wheel driver, ring side out, onto the vehicle rear
axle. Make sure the rear wheel driver fits onto the pins in the
motor assembly.
• Slide a wide rear vehicle wheel (labeled L), ribs facing in, onto the
vehicle rear axle. Make sure the ribs on the wide rear vehicle wheel
fit into the grooves on the rear wheel driver.
• Slide a large hubcap, indented side out, onto the vehicle rear axle.
Large Hubcap
Indented Side Out
Rear Wheel Driver
Ring Side Out
Wide Rear
Vehicle Wheel
Ribs Face In
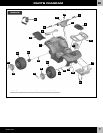
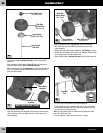
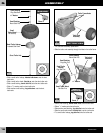
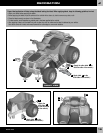
• Fit a .437 cap nut on the end of the vehicle rear axle.
• Fit the cupped end of the assembly tool over the cap nut and tap
the end of the assembly tool with a hammer to secure the cap nut
on the end of the vehicle rear axle.
Hint: You may need the help of another adult to support the other
end of the vehicle rear axle.
• Pull the wide rear vehicle wheel to be sure it is secure.
Assembly
Tool
Cap Nut
.437"
8
9