


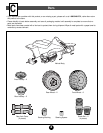
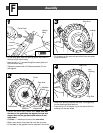

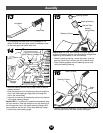
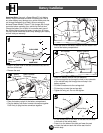
• Slide a hex bushing onto the front axle. The ring side of
the hex bushing should face out.
• Press firmly to fit all but the ring on the end of the hex
bushing into the front wheel.
Front Axle
Hex Bushing
Ring Side
9
• Fit a cap nut on the end of the front axle.
• Tap the cap nut with a hammer to secure it on the end of
the front axle.
• Pull on the wheel to make sure the cap nut is securely
fastened.
• Repeat this procedure to assemble the other front wheel
to the other front axle.
• Set the vehicle body aside.
Cap Nut
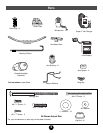
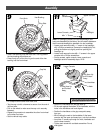
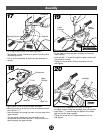
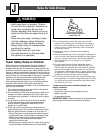
• Position the handlebar with the grip area up.
• Fit the neck against the bottom of the handlebar, with the
holes in the handlebar and neck aligned.
• Position the handlebar so the grip area points away
from you.
• While holding the neck to the handlebar, fit the lower
console, with the open end toward you, onto the handlebar.
• Insert two 2" screws up through the neck, handlebar and
into the lower console.
• Tighten each screw with a slotted screwdriver. Do not
over-tighten.
Handlebar
Neck
Assembly
10
12
11
Lower Console
11
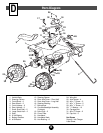
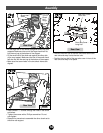
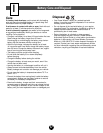
Note: For packaging reasons, the console/headlight has
been pre-assembled at the factory.You will need to disassem-
ble the console/headlight to assemble it to the handlebar.
• Loosen and remove the #6 x
1
/
2
" screw in the headlight
with a Phillips screwdriver. Remove the headlight by first
pulling the bottom out slightly and then pushing the
headlight up.
• Loosen and remove the two #8 x 1" screws in the upper
console with a Phillips screwdriver.
• Set the screws, upper console, lower console and
headlight aside for assembly steps 12-20.
Upper Console
Headlight
#8 x 1"
Screws
#6 x
1
/
2
" Screw
Lower Console
Grip Area Up
and Pointed
Away
Grip Area Up
and Pointed
Away
Open End