


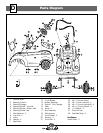
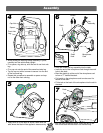

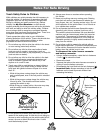

Assembly
• Note the two T-loops at the end of each seat belt strap.
• With the fastener strip facing the seat, insert the end
T-loop at the end of a seat belt strap though a slot in
the vehicle body seat. Do not insert the second
T-loop through the slot.
• With the fastener strip facing away from the seat, insert
the end T-loop on the other seat belt strap through the
slot on the other side of the seat. Do not insert the
second T-loop through the slot.
Fastener
Seat Belt Strap
Seat Belt Strap
T-Loop
Fastener
T-Loop
Slots
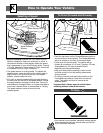
Seat Back
Notch
Second
Position
Rib
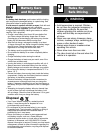
Please Note: Use of the seat back is optional, depending
on your child's height. The seat back can be assembled in
either of two positions or can be removed to accomodate
a larger child.
• Check your child's fit in the vehicle by observing foot to
pedal distance. Determine whether to place the seat
back in the first position or second position, if needed.
• To assemble the seat back, fit the notches in the sides
of the seat back over the first or second set of ribs on
the vehicle body.
• Insert two #8 x 1" (black) screws through the holes in
the top of the seat back and into the vehicle body.
• Tighten the screws with a Phillips screwdriver. Do not
over-tighten.
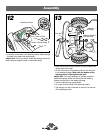
Helpful Hint: If you choose not to use the seat back,
store it in a safe place for future use. To store the two
#8 x
1
/
2
" screws, insert them into the holes in the vehicle
body and tighten with a Phillips screwdriver.
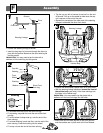
One-time assembly is now complete.
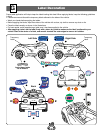
Two extra cap nuts have been included with your vehicle.
Make sure that you do not have any extra washers or
bushings. If you have any extra washers and/or
bushings, you have probably incorrectly assembled the
front wheels. To correct the front wheel assembly, use
pliers to firmly squeeze the cap nut on the end of each
front axle and remove it. Discard the used cap nuts. Re-
read and repeat assembly steps 1 and 2 to re-assemble
the front wheels.
17
18
First
Position
Rib
14
16
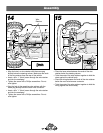
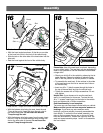
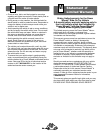
• Position the vehicle body upright.
• With the hood angled as shown, fit the tab on one side
of the hood into a slot in the front of the vehicle body.
• Slide the tab on the other side of the hood down into the
other slot.
• Rest the hood against the front of the vehicle body.
Hood
Tab
Tab
Slot
Slot