


Catalog #71003
Brochure #63-0261
©2004 Edelbrock Corporation
Rev. 3/04 - DC/mc
Page 12 of 22
2.5.1 Nitrous Solenoid Mounting and Installation
1. Hold the nitrous solenoid securely (such as in a bench vise) being careful not to harm the solenoid or
block the inlet or outlet of the solenoid.
2. Install nitrous filter fitting (Blue fitting 4AN X 1/8NPT) using liquid Teflon paste in the inlet port of the
nitrous solenoid. Apply liquid Teflon paste to nitrous filter fitting. Install nitrous filter fitting to inlet port
of the N
2
O solenoid.
3. Install the blue 3AN X 1/8NPT fitting using liquid Teflon in the outlet port of the nitrous solenoid.
i. Remove nitrous solenoid assembly from vise.
ii. Attach solenoid mounting bracket to the bottom of the nitrous solenoid.
iii. Verify the desired mounting location for the nitrous solenoid.
4. Install the nitrous solenoid. If the solenoid mounting location in difficult to access, leave the solenoid
loose so the solenoid inlet and outlet ports can be easily accessed.
5. Leave the wires loose for electrical installation.
6. Attach the nitrous feed line to the inlet side of the solenoid.
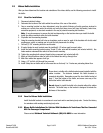
2.5.2 Fuel Solenoid Mounting and Installation
1. Hold the fuel solenoid securely (such as in a bench vise) being careful not to harm the solenoid or block
the inlet or outlet of the solenoid.
2. Install either the 1/8 NPT to Fuel Hose Filter Fitting into the fuel inlet fitting using liquid Teflon paste in
the inlet port of the fuel solenoid.
3. Install the red 3AN X 1/8 NPT flare fitting using liquid Teflon paste in the outlet port of the fuel solenoid.
4. Remove the fuel solenoid assembly from vise.
5. Attach the universal solenoid mounting bracket to the bottom of the fuel solenoid using 2 of the solenoid
mounting screws.
6. Verify the desired mounting location of the fuel solenoid.
7. Install the fuel solenoid. If the solenoid mounting location is difficult to access, leave the solenoid loose
so the solenoid inlet and outlet port can be easily accessed.
8. Leave the wires loose for the electrical system installation.
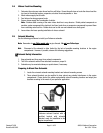
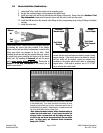
2.6 Nozzle Installation
1. Determine the nozzle mounting location in the intake boot, just before the throttle body. Make sure that the
nozzle, mounting collar, and the feed lines from solenoids to nozzle do not interfere with any systems or
components of the vehicle such as the hood latching device.
2. Mark where the nozzle will be placed.
3. Remove the intake boot.
4. Drill a 7/16” hole in the intake boot where nozzle placement was determined.
5. Remove all the debris left by the drilling operation.
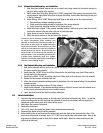
6. Before installing the nut and collar into the intake boot, check the depth of the nozzle into the collar. If the
nozzle does not protrude far enough, use a 1/8”-27 NPT tap to tap the hole to the proper depth. Refer to the
diagram on the following page to check for the proper nozzle depth. Install the nozzle mounting nut and
collar into the inlet pipe.
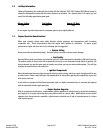
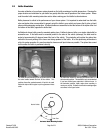
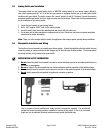
Pictured here are the Performer Solenoids mounted in
an engine compartment. When mounting your
solenoids, be sure that the solenoids are located in a
place where you have ample line lengths between the
nozzle and the solenoids. Be sure that there is a little
slack in the lines between the nozzle and solenoids to
prevent any lines from kinking. Be sure that the inlet
and outlet ports of the nitrous and fuel solenoids are
easily accessible. If you are mounting your solenoids in
a location where accessibility might be a problem,
install the lines onto the solenoids before mounting the
solenoids in their mounting location
.