


Catalog #71003
Brochure #63-0261
©2004 Edelbrock Corporation
Rev. 3/04 - DC/mc
Page 11 of 22
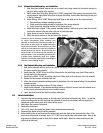
2.4 Nitrous Feed Line Mounting
1. Determine the route your main nitrous feed line will follow. Ensure the path does not route the nitrous feed line
too close to the exhaust system, suspension, electrical lines/components or tires.
2. Attach nitrous supply line to bottle.
3. Feed nitrous line along proposed route.
4. Secure nitrous supply line to underside of vehicle.
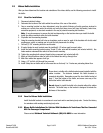
Note: Stainless steel covering of the main nitrous feed line is very abrasive. Shield painted components or
sensitive system components like electrical, fuel lines, brake lines or suspension components to prevent them
from contacting main feed line. Rubber hose can be slid over and retained as a chafe guard.
5. Leave nitrous line loose pending installation of nitrous solenoid.
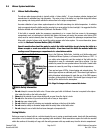
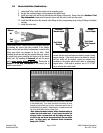
2.5 Solenoid Mounting
Use the following procedures to install your Performer solenoids.
Note: Remember to use
Teflon paste only on pipe threads. Do not use Teflon tape.
Hint: Placement of the solenoid is often limited by the lack of possible mounting locations in the engine
compartment. However, if possible, observe the following suggestions:
Solenoid Safety Information
1. Keep solenoids and lines away from exhaust components.
2. Trial fit the solenoids with all lines attached to ensure a proper fit.
3. Solenoids may be mounted sideways or upside-down, if necessary.
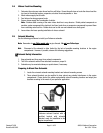
Preparing to Mount Your Solenoids
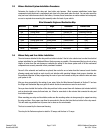
1. Locate the universal solenoid mounting brackets and solenoid mounting screws.
2. These solenoid brackets can be modified to clear almost any potential interference in the engine
compartment. Please look at the photos and potential solenoid mounting locations and adapt your
brackets according to the needs of your particular application.
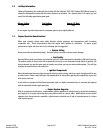
Pictured above is an unmodified
Performer solenoid bracket with a
modified bracket with solenoid
attached, ready for installation in the
engine compartment.