©2002 Edelbrock Corporation
Rev. 9/02
Brochure No. 63-0142
Catalog #71001
Page 18 of 21
3.7 Microswitch Installation and Wiring (Continued)
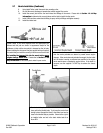
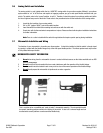
The bolts used to attach the microswitch have extra length to allow for spacing the microswitch away from the bracket to offer
a level of adjustability of the microswitch. After determining the position of the microswitch, we recommend trimming the bolts
for a clean installation.
Due to the wide variety of throttle linkage combinations in use, it is impossible to supply a microswitch bracket custom-tailored
to each application. The universal bracket-supplied will need to be modified to fit your specific application.
Please look for potential microswitch mounting locations and adapt your microswitch bracket according to the needs of your
particular application.
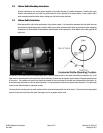
The microswitch bracket is drilled to allow many different switch mounting positions. This flexibility allows the microswitch to
be positioned in such a manner that it will engage the throttle linkage without interfering with its normal and safe operation.
The bracket may be manipulated (bent, twisted, and/or cut) to best suit your combination. Mount the microswitch so the
actuation arm is triggered by throttle linkage making sure all wiring and the bracket do not interfere with the smooth and safe
operation of the throttle linkage.
Adjust microswitch to ensure the actuation arm “clicks” at the same point your throttle linkage reaches wide open throttle
against the throttle stop.
At no time should the microswitch be enabled before wide open throttle.
4.0 Before You Run Your Vehicle Using Your Edelbrock Nitrous System
You have just completed the installation of your Edelbrock Nitrous System. It is time to perform some basic system checks to ensure all
of the work you have done is correct and ready to operate properly. The following procedure is designed to validate the operation of your
nitrous system before operating your vehicle:
Note: Before performing steps 1 through 5, make sure that the nitrous bottle is closed and main nitrous supply line
is empty of any nitrous.
4.1 Fuel System Check
1. Hook up all battery leads.
2. Double-check all wires and leads for signs of heat and proper connections.
3. Turn the ignition key to the engine "on" position without starting the engine.
4. Inspect fuel lines for any leaks when under pressure. If any fuel leaks are found, immediately turn the ignition key to
the “off” position and repair the leak.
4.2 Nitrous System Check
1. With the vehicle's engine running, slowly open nitrous bottle valve.
Note: There should be no change in engine idle speed. If idle speed changes, close nitrous bottle valve immediately
and refer to the "Troubleshooting Guide" found in the back of this manual.
2. Inspect nitrous lines and fittings for leaks using a soapy water mixture and a small brush.
3. If any of the fittings/connections show bubbling around the attachment nut or on the threaded area of the fitting, shut
the nitrous bottle valve off immediately and dry the fitting before attempting any service to that particular fitting
connection.
4. If the engine idle does not come up, and all of the fittings appear to be leak-free, you have successfully completed the
installation of you Edelbrock Nitrous System.


