


Page 11 of 21©2002 Edelbrock Corporation
Rev. 10/02
Brochure No. 63-0144
Catalog #70406
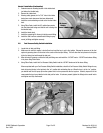
2.6.2 Nitrous Solenoids Mounting (Continued)
7. Install solenoid assembly in desired location.
8. Leave all wiring loose for electrical systems installation.
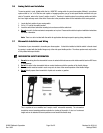
9. Connect main nitrous feed line to inlet fitting (4AN x 1/8 NPT nitrous filter fitting) of the first nitrous solenoid
and 3AN 90º lines to 3AN Outlet Flare Tee.
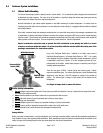
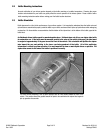
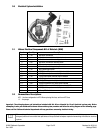
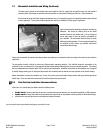
Here is a typical EFI solenoid assembly, mounted in the
engine compartment of our Mercury Marauder, using a
non-modified EFI solenoid bracket. Modifications
performed to a solenoid bracket depend on many factors.
When mounting the solenoid assembly on the vehicle,
considerations should be taken regarding any potential
interference with the vehicle's systems or components.
The line length between the Performer EFI solenoid
assembly and the jet fitting on the nitrous spray nozzle is
24 inches. This should also be considered when mounting
the solenoid assembly.
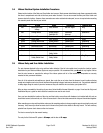
2.7 Nitrous Spray Nozzle Installation
The 70406 2003-Later Mercury Marauder Nitrous System requires 2 nitrous nozzles to be installed in the intake boot in 2
separate locations. Follow the steps below for proper nozzle mounting.
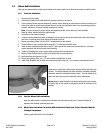
Nozzle 1 Installation
1. Determine nozzle mounting location on the same side of the
air filter housing as the MAF sensor as shown to the right.
2. Remove the air filter housing.
3. Wearing safety glasses, drill a 7/16" hole in air filter housing
where nozzle placement has been determined.
4. Install nozzle mounting nut and collar into air filter housing.
5. Using Teflon Paste, install the straight outlet nitrous nozzle
into the mounting nut.
6. Re-Install air filter housing.
7. Install the 32 nitrous jet into the nozzle jet fitting.
8. Install 3AN line from solenoid outlet fitting to spray nozzle jet
fitting and tighten securely.
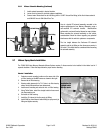
Installation for
straight outlet
Nitrous nozzle
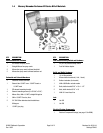
1/8” NPT Plug
3AN Flare Tee
Outlet Port
Inlet Port
Inlet Fitting
Solenoid Tee