


Page 13 of 22
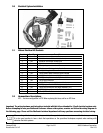
Catalog #70403
Brochure No. 63-0147
©2003 Edelbrock Corporation
Rev. 1/03
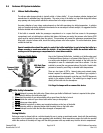
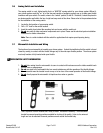
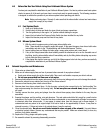
2.8 EFI Vacuum “Tee” Installation
1. Install the recommended jet into the EFI Vacuum
“Tee” and tighten fitting securely.
2. Remove vacuum line from the vehicle’s fuel pressure
regulator.
3. Install vacuum line from the vehicle’s fuel pressure
regulator onto the center barb fitting of the EFI
Vacuum “Tee”.
Note: The center barb can easily be identified by the
anodized nut used to hold the Fuel Jet.
4. Measure the correct length of vacuum line from the
barb on the Fuel Pressure Regulator to one port of
the EFI Vacuum “Tee”. Cut vacuum line and install.
5. Measure the correct length of vacuum line from the
barb fitting of the nitrous pressure regulator to the
remaining open port on the EFI Vacuum “Tee”. Cut
vacuum line and install.
2.9 Fuel Pressure Safety Switch Installation
1. Locate fuel rail test port fitting.
2. Make sure the vehicle’s engine is cool, release
pressure in fuel system by pressing down on valve
in center of the fitting. This will allow the pressure to
escape as well as some fuel.
3. After relieving all pressure, remove test port fitting
core and install the 1/16 NPT male x 1/8 NPT female
brass fitting in its place, using liquid Teflon.
4. Using liquid Teflon, install Fuel Pressure Safety
Switch into 1/16 NPT male x 1/8 NPT female brass
adapter.
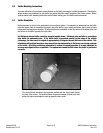
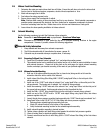
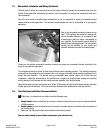
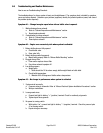
Note: On some vehicles, there is no test port fitting,
or the location of the test port fitting does not allow
ample room for the fuel pressure safety switch to be mounted. These applications (as shown in the photo) will
require the “Banjo nut” at the fuel filter to be drilled and tapped (1/16 NPT tap supplied with system) to allow
mounting of the fuel pressure safety switch.