©2003 Edelbrock Corporation
Brochure No. 63-0173
Rev. 02/03
Page 22 of 23
Symptom #5… No change in performance when system is activated.
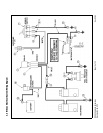
1. System wired incorrectly.
a. Compare wiring to schematic.
i. Wire per instructions.
2. Loose ground wires.
a. Connect test light to battery “+” (positive) terminal. Check for continuity at grounds.
i. Tighten/repair loose grounds.
3. No power to arming switch.
a. With ignition on, connect test light to battery “–” (negative) terminal. Check for power at pole #1
on arming switch.
i. Repair wiring.
4. Malfunctioning arming switch.
a. With ignition on, turn arming switch on. Connect test light to battery “–” (negative) terminal.
Check for power at red wire on arming switch.
i. Replace arming switch.
5. Malfunctioning microswitch.
a. Turn arming toggle off. Close throttle microswitch, check for continuity between microswitch
wiring terminals.
i. Replace microswitch.
6. Inadequate nitrous supply.
a. Weigh bottle.
i. Bottle should be 10 lbs. above empty bottle weight listed on bottle label when full.
b. Check bottle temperature.
i. Maintain 80 to 85 degrees of bottle surface temperature.
c. Check bottle valve.
i. Open valve fully.
d. Check bottle orientation.
i. Mount bottle properly.
7. Mismatched nitrous/fuel jetting
a. Compare jetting to recommended values.
i. Install correct jets
b. Verify the number stamped in the jet match the desired power level.
i. Acquire the right size jets and install correct jets.
8. Excessive fuel pressure.
a. Perform Fuel Pressure Test Procedure.
b. Install fuel pressure gauge.
i. Regulate pressure to proper settings.
9. Loose nitrous solenoid wiring.
a. Inspect solenoid wiring. See
“Electrical System Installation”
section.
b. Consult a book concerning proper wiring methods.
10. Malfunctioning nitrous solenoid.
a. Inspect solenoid wiring. See
“Electrical System Installation”
section.
i. Repair wiring.
b. Inspect solenoid. See symptom #2.
i. Rebuild/replace solenoid.


