


Catalog #70080, #70081, #70082, #70083
Brochure No. 63-0312
©2008 Edelbrock Corporation
Rev. 07/08
Page 14
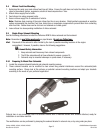
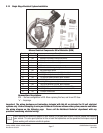
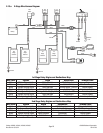
2.6 Nitrous Solenoid Mounting and Installation
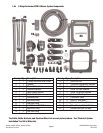
1. Attach the solenoid mounting bracket to the bottom of the nitrous solenoid.
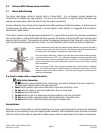
2. Hold the solenoid securely (like in a bench vise) being careful not to harm the solenoid or block the inlet or outlet of
the solenoid.
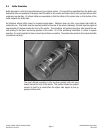
3. Install nitrous filter fitting (Blue fitting 6AN X 1/4 NPT) using liquid Teflon in the inlet port of the nitrous solenoid.
4. Install the blue 4AN X 1/8 NPT flare fitting using liquid Teflon in the outlet port of the nitrous solenoid.
i. Remove nitrous solenoid assembly from vise.
ii. Verify desired mounting location for nitrous solenoid.
5. Install nitrous solenoid. If solenoid-mounting location is difficult to access, leave solenoid loose so the solenoid inlet
and outlet port can be easily accessed.
6. Leave wires loose for electrical system installation.
7. Attach nitrous feed line to the inlet side of the solenoid.
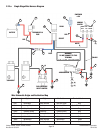
The modifications performed to a solenoid bracket depend on many factors. The considerations of solenoid placement are
the same for both Nitrous and Fuel. The modifications for all system brackets will be different per your application.
The line length between the Victor Pro fuel solenoid and the jet fitting on the injection plate is 8 inches. The line length
between the Performer RPM nitrous solenoid and the jet fitting on the injection plate is 12 inches. Other factors or
components that could potentially interfere with solenoid placement are:
• Water neck/thermostat housings
• Water fittings
• Distributor housing
• Vacuum advance canister
• Air filter housing
• Throttle linkage passageways
• Valve covers and valve cover fasteners
• EGR passageways
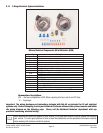
2.7 Fuel Solenoid Mounting and Installation
1. Hold the fuel solenoid securely (like in a bench vise) being careful not to harm the solenoid or block the inlet or outlet
of the solenoid.
2. Install the 1/4”NPT to 1/8”NPT Reducer into the inlet side of the Victor Pro Fuel Solenoid.
2. Install the 6AN X 1/4 NPT (Red straight fitting) fuel inlet fitting using liquid Teflon in the reducer in the fuel solenoid.
3. Install the red 4AN X 1/8 NPT flare fitting using liquid Teflon in the outlet port of the fuel solenoid.
4. Remove fuel solenoid assembly from vise.
5. Attach the universal solenoid mounting bracket to the bottom of the fuel solenoid using 2 of the solenoid mounting
screws.
6. Verify the desired mounting location of the fuel solenoid.
7. Install the fuel solenoid. If the solenoid mounting location is difficult to access, leave the solenoid loose so the solenoid
inlet and outlet port can be easily accessed.
8. Leave the wires loose for the electrical system installation.