


2001 Edelbrock Corporation
Brochure No. 63-0040
©
Rev. 11/01
Page 18 of 25
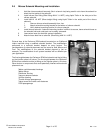
2.14 Microswitch Installation and Wiring (continuation)...
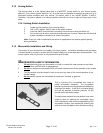
Due to the wide variety of throttle linkage combinations in use, it is impossible to supply a microswitch
bracket custom tailored to each application. The universal bracket supplied will need to be modified to fit
your specific application.
The microswitch bracket supplied is drilled to permit many different switch mounting positions. This
flexibility allows for the microswitch to be positioned in such a manner to engage the throttle body linkage
without interfering with its normal and safe operation. The bracket may be manipulated (bent, twisted,
and/or cut) to best suit your combination. Mount the microswitch on the throttle body so the actuation arm
is triggered by the throttle linkage making sure that all wiring and the bracket do not interfere with the
smooth and safe operation of the throttle body. Be sure the actuation arm “clicks” at the point where the
throttle is wide open.
2.15 Final Electrical Installation Recommendations
At this time, it is advised that you double check the following areas:
1. Double Check all wires so that they do not come in contact with any heat sources like
exhaust manifolds, and EGR crossovers, etc.
2. Double Check the wires that lead from the microswitch to ensure that they do not interfere
with the operation of the throttle body linkage.
You are now ready to hook up your battery and prepare your vehicle to run.
3.0 Before You Run Your Vehicle Using Your Edelbrock Nitrous System
You have just completed the installation of your Edelbrock Nitrous System. It is time to perform some basic system
checks to ensure all of the work you have done is correct and ready to operate properly. The following procedure
is designed to validate the operation of your nitrous system before operating your vehicle:
Note: Before performing steps 1 through 4, make sure that the nitrous bottle is closed and main nitrous
supply line is empty of any nitrous.
3.1 Fuel System Check
1. Hook up all battery leads.
2. Double-check all wires and leads for signs of heat and proper connections.
3. Start your vehicle.
4. Check all fuel lines and fittings for leaks.
5. Switch master arming switch to the “on” position (switch should now glow red). Make sure
the nitrous bottle is closed and the main feed line are completely empty of ANY
nitrous! Raise the engine speed to above 2000 RPM. Briefly depress the activation arm
on the microswitch, which will open the fuel and nitrous solenoids. Listen for a loud click
or hold the solenoids while you activate the microswitch. The engine speed to decrease
if the fuel solenoid and delivery system are performing properly. If not, refer to the
“TroubleShooting Guide” located in the back of this manual.
3.2 Nitrous System Check
1. With the vehicle's engine running, slowly open nitrous bottle valve.
Note: There should be no change in engine idle speed. If idle speed changes, close
nitrous bottle valve immediately and refer to the "Troubleshooting Guide" on pages 25-26.
2. Inspect nitrous lines and fittings for leaks using a soapy water mixture and a small brush.
3. If any of the fittings/connections show bubbling around the attachment nut or on the
threaded area of the fitting, shut the nitrous bottle valve off immediately and dry the fitting
before attempting any service to that particular fitting connection.
4. If the engine idle does not come up, and all of the fittings appear to be leak-free, you have
successfully completed the installation of you Edelbrock Nitrous System.