


03-TM-0037 REV 13
Page 9 of 24
2.6. INSTALLATION PROCEDURES FOR
THE DK100/DK120 AND THE N30A26
SERIES MOUNTING KIT.
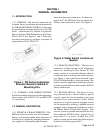
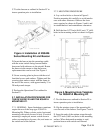
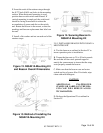
2.6.1. GENERAL. Model N30A26 Series
Mounting Kit (Cradle Type) is an aluminum
extrusion with a screw-attached securing plate
that provides rugged mounting and protection of
the beacon within the aircraft. See Figure 3. The
beacon should be mounted horizontally with the
switch end forward, if possible. If vertical
mounting is necessary, switch end must be
mounted downward to prevent accumulation of
dirt, grease and water on the switch end.
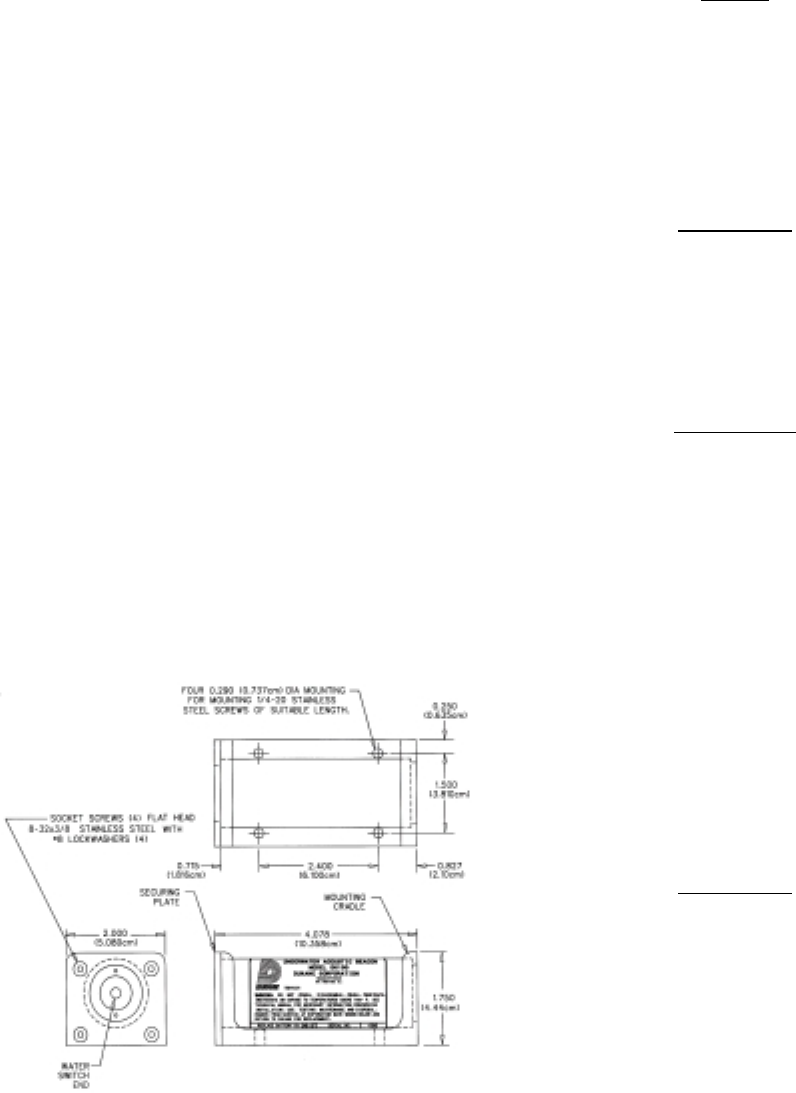
2.6.2. CRADLE MOUNTING PROCEDURE.
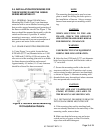
A. Using Figure 3 as a guide, locate the four
0.290 inch (0.737 cm) diameter holes on 1.500
by 2.400 inch (3.810 by 6.100 cm) centers. Be
sure access to the securing plate end is available
for future beacon installation and removal.
Approximately 4.5 inches (11.43 cm) clearance
should be allowed for beacon removal.
Figure 3. N30A26 Series Mounting
Kit Installation Details
NOTE
The mounting bracket can be used as a tem-
plate to mark for drilling the holes prior to
the installation of beacon. Always remove
beacon from mount prior to marking or drill-
ing.
CAUTION
WHEN MOUNTING TO THE AIR-
FRAME, CHECK THE OPPOSITE
SIDE OF THE FRAME OR BULKHEAD
FOR DRILLING CLEARANCE.
WARNING
USE PROTECTIVE EYE EQUIPMENT
DURING DRILLING OPERATION.
B. After the four 0.290 inch (0.737 cm) diameter
holes have been located, drill the holes with an
“L” twist drill.
C. Secure the mounting cradle to the aircraft
structure with four 1/4-20 stainless steel screws
and associated washers and nuts (not furnished),
as shown in Figure 3. Alternate mounting with
threaded holes may be employed where structure
does not permit nuts on rear side.
CAUTION
DO NOT ADD ANY UNAPPROVED
STAMP, ETCHING, OR LABEL TO
THE BEACON CASE OR END CAPS.
2.6.3. INSTALLING DK100/DK120 BEACON
INTO N30A26 SERIES MOUNTING KIT.
A. If the securing plate and its attaching hard-
ware are already attached to the main body of the
mounting cradle, remove them.
B. Make sure that the beacon case and water
switch are free of grease or film. If in doubt,
wipe clean with mild detergent.