


Page 7
MAINTENANCE
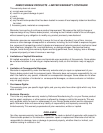
1. Frequently check brake fluid level. (Fluid must be approved, clean, and uncontaminated.)
2. Make sure actuator mounting bolts are secure.
3. Inspect actuator, replace bent, worn, or damaged parts.
4. Be constantly aware of systems braking quality, make periodic checks as described in brakes ownerís
manual. Consult certified brake specialist to make necessary adjustments or repairs. Failure to do so
could result in loss of braking.
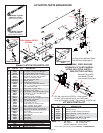
SERVICING THE EMERGENCY LEVER
(SEE PAGE 10 FOR BREAKDOWN AND REFERENCE NUMBERS)
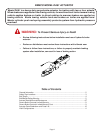
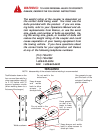
If emergency lever (#16) of actuator is applied, it can be disengaged by using a screwdriver to lift
upward on front of flat emergency lever spring (#12) while pulling lever forward until released.
A thorough inspection of emergency lever, emergency lever spring, and cable with S-hooks is required.
Damaged parts must be replaced as follows:
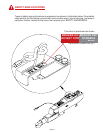
a. Remove master cylinder (#21) and push rod assembly (#18). Be careful not to get dirt into
master cylinder. (A new Master Cylinder Gasket (#20) should be used when reinstalling.)
b. Remove Cable S-hook (#10) from emergency lever (#16), emergency lever guide (#23) and flat
emergency lever spring (#12), then pull lever out of actuator outer case (#7) through cross-slot
in top.
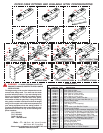
c. Install new emergency lever through cross-slot in top of outer case. Attach new emergency lever
spring and emergency lever guide.
d. Insert S-hook on emergency cable (#10) into hole in emergency lever(#16) and squeeze shut.
e. Add adequate brake fluid to master cylinder and bleed brake system per instructions 4-6 in installation
section.
5. Once bleeding is completed, refill master cylinder and attach cap (#17) securely. Replace
emergency lever spring, lever guide, lock washers and 5/16" hex head bolts.
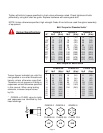
6. Test brakes by pulling emergency lever (#16) forward until it locks into its second notch
position. (Lever should be approximately straight up.) Attempt to rotate wheels in a forward
direction. If any wheels rotate, brakes must be adjusted. To adjust brakes, release
emergency lever from locked position, set each wheelís brake adjustment up 2 or 3 notches
(per instructions in appropriate brake cluster manual). Repeat test procedure as necessary.