


4 MAN#650336
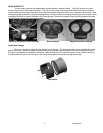
FUNCTION SWITCH
If an MCL-30K-SPD gauge is installed, then the factory speedometer push button switch is used as the main
function switch, otherwise a push button switch should be connected and mounted to allow access to all of the gauge
features. The function switch is used for setup and for adjusting the clock.
The function switch can also be used to change the tachometer display. If an MCL-30K-SPD gauge is also
installed, be sure the speedometer is displaying the odometer to avoid resetting any of the other settings before
attempting to change the tachometer. Press and hold the switch for about 4 seconds to change the tach menu. Press
and hold the switch for about 6 seconds to reset the high RPM recall while it is displayed. The tachometer only has two
display modes as follows:
TACH MENU
CLOCK > 12:00 12 hour clock
HI RPM > 0000 high rpm recall
GAUGE SETUP AND CALIBRATION
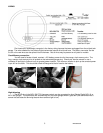
The function switch, discussed above, is used to enter setup mode for all of the gauges. If you are only
installing one or a couple Dakota Digital MCL-3K gauges, then setup may seem a little strange since they are designed
to work as a set. The first step in the setup procedure is to select which gauge you are going to adjust. Each gauge
will either show a number or a label. If the gauge is showing a label then that gauge will be selected to enter setup. All
of the other gauges will exit setup and allow the selected gauge to be changed. To get into setup, press and hold the
function switch while turning the key on. Press and release the switch to advance through the menus below, when on
the desired option press and hold the switch to select setup for that particular gauge/function.
speed tach oil psi oil temp fuel volt
1
st
- 1 - CL - 1 - - 1 - - 1 - - 1 -
2
nd
SPd - 2 - - 2 - - 2 - - 2 - - 2 -
3
rd
- 3 - tCH - 3 - - 3 - - 3 - - 3 -
4
th
- 4 - - 4 - PSI - 4 - - 4 - - 4 -
5
th
- 5 - - 5 - - 5 - F or C - 5 - - 5 -
6
th
- 6 - - 6 - - 6 - - 6 - FUL - 6 -
7
th
- 7 - - 7 - - 7 - - 7 - - 7 - uLt
8
th
- 8 - - 8 - - 8 - - 8 - - 8 - - 8 -
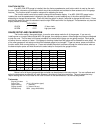
FACTORY DEFAULT SETTINGS FOR SETUP MENUS
Below is a list of factory gauge settings and what can be adjusted in the setup menus. You can calibrate and
adjust the tachometer as often as you wish, however it should only need to be set once. The only gauge that may
require setting after the initial install is the Clock function on the tachometer so it is the first setup menu.
Tachometer
Engine Cylinders 2
Signal Type 12 HI (12V ignition signal)
Night Dimming 1 (darkest)
Display Update 3 (fastest 1/8 sec.)
RPM Warning 5500 (range 2200-9900)