


MAN# 650031C
5
Changing the output speed:
The output speed can be used to slow down systems with large air lines or high pressure tanks so that
the system will operate more reliably and stop at the desired height with minimal overshoot.
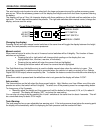
1. Begin with the key off and then hold the left Setup Select Switch in while turning the key on. The display
will show (“CODE” “AC44B”, aluminum control case)( “CODE” “AC48”, plastic control case).
2. Release the switch. The display will show “SETUP” “DONE”.
3. Press the up or down Setup Switch until “SPEED” is displayed.
4. Press and release the left Setup Select Switch. The display will show “FRONT” “SPEED” and the current
speed setting.
5. Use the up or down Setup Switch to change the speed number from 1 to 15 with 15 being the slowest.
When the desired value is shown press and release the left Setup Select Switch.
6. The display will now show “REAR” “SPEED” along the current setting for the rear bags.
7. Use the up or down Setup Switch to change the value and press and release the left Setup Select Switch
when done.
8. The display will show “SETUP” “DONE”. Press the left Setup Select Switch or turn the key off to exit.
Changing the tank warning point:
The tank warning point can be adjusted from 0 to 248 psi. When the tank pressure drops below this
point the tank reading will flash and the display will automatically switch to the tank pressure display. If the
tank pressure sender is disconnected this is disabled.
1. Begin with the key off and then hold the left Setup Select Switch in while turning the key on. The display
will show (“CODE” “AC44B”, aluminum control case)( “CODE” “AC48”, plastic control case).
2. Release the switch. The display will show “SETUP” “DONE”.
3. Press the up or down Setup Switch until “WARN” is displayed.
4. Press and release the switch. The display will show “TANK” “WARN” and the current set point.
5. Press the up or down Setup Switch to change the value. When the desired value is shown, press and
release the left Setup Select Switch.
6. The display will show “SETUP” “DONE”. Press the left Setup Select Switch or turn the key off to exit.
The advanced control options:
No changes will normally be made to these settings. There are four options under the advanced menu,
“ADV TIME”, “ADV” “ERR”, “ADV F PSI”, and “ADV R PSI”. The time setting is the minimum time the controller
must see a corner out of adjustment before it will try to make a correction. This time delay avoids nuisance
corrections during acceleration, deceleration, and cornering. The error setting is the minimum error that a
corner must have before it is seen as too low or too high. The F PSI and R PSI menus set limits when both
pressure and height sensors are used together. They adjust how far the pressures are allowed to differ from
side to side when trying to make corrections for height. Rigid frame vehicles may need to reduce the R PSI
setting to keep the rear bags balanced on uneven ground.
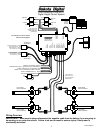
The remote setup options:
The remote system setup requires the ARR-2000 remote system. This system plugs into a connector
on the back side of the controller. The remote system is only operational when the key is turned off. The
remote system has two modes of operation, one for individual corner control and another that controls the front
bags together and the rear bags together (more information on remote system in the ARR-2000 manual).
The REM selection has another set of menus underneath it. They are:
MODE - select remote operation mode.
PRGM - program the key-chain transmitters into the system.
TEST - test the operation of the key-chain transmitters.
Troubleshooting guide.
IMPORTANT: Make sure to always disconnect the negative cable from the battery if you are going to
be working on or under the vehicle. Failure to do so can result in serious injury if the system is
accidentally activated.