


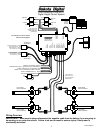

MAN# 650031C
4
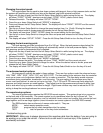
Manual Control / Setup Switches
SETUP SELECT
SETUP UP
SETUP DOWN
Setup Menus:
To enter the setup mode, press and hold the Setup Select Switch while turning the key on. Use the top and
bottom Setup Switches to scroll up and down through the menus. Use the Setup Select switch to select a
menu item.
The menus are:
DONE - exit the setup routine
REM - Remote system setup (operation mode and transmitter programming)
SENSR - Sensor programming (adjusting for mechanical arm travel)
SPEED - Solenoid control speed (to slow down fast air systems)
WARN - Tank warning point setup
KEYON - Select operation mode when key is turned on.
ADVNC - Advanced control setup options.
Programming sensor travel:
1. Begin with the key off and then hold the left Setup Select Switch in while turning the key on. The display
will show (“CODE” “AC44B”, aluminum control case)( “CODE” “AC48”, plastic control case).
2. Release the switch. The display will show “SETUP” “DONE”.
3. Press the up or down Setup Switch until “SENSR” is displayed.
4. Press and release the left Setup Select Switch switch. The display will toggle between “DUMP” “ALL” and
“DONE” “PRS M”.
5. Use the down Setup Switch to dump the air from all of the bags and then press the M switch (medium
switch on left side of display)
6. The display will now toggle between showing a number for each of the four corners, “RAISE” “ALL”, and
“DONE” “PRS M”. Use the up Setup Switch to raise all bags to their full height. The numbers will begin
increasing until they reach 100 and then it will stay at 100. If any bag does not get to 100 then that sensor
may need adjustment to increase the arm travel.
7. Press the left Setup Select Switch to control front only, the right Setup Select Switch to control rear only, or
both left and right Setup Select Switches together to control all 4 corners.
8. When all four corners are fully raised, press the M switch(medium switch on left side of display)
9. The display will show “SETUP” “DONE”. Press the Setup Select Switch or turn the key off to exit.
Changing the key on mode:
When the key is turned on, the system can be set up to go to back to the last mode it was in before the key
was turned off, it can always start up in the “M” (medium) auto mode, it can always do an auto raise to the “M”
setting and then turn the auto mode off, or it can always start with the auto mode off.
1. Begin with the key off and then hold the left Setup Select Switch in while turning the key on. The display
will show (“CODE” “AC44B”, aluminum control case)( “CODE” “AC48”, plastic control case).
2. Release the switch. The display will show “SETUP” “DONE”.
3. Press the up or down Setup Switches until “KEYON” is displayed.
4. Press and release the switch. The display will show “KEYON” and the current setting
(“LAST”, “M”, “M OFF”, or “OFF”).
5. Press the up or down Setup Switches to change the setting. When the desired setting is shown, press and
release the left Setup Select Switch.
6. The display will show “SETUP” “DONE”. Press the left switch or turn the key off to exit.