


MAN# 650031C
2
Introduction
Congratulations, you have purchased one of the finest AIR-Ride Height Control Systems available. This
system can:
• use height sensors, pressure senders, or both height and pressure senders to monitor and control of
all four corners of the vehicle with the option of monitoring the tank pressure.
• have three different height presets for automatic up/down control, manual up/down control, and to
completely empty the air bags.
• be connected to an ARR-2000 remote transmitter system to allow remote control of the air bag system
when the key is off.
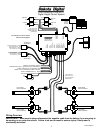
Sensor Types
Here are the possible setup configurations for height, pressure, or both height and pressure based
systems:
• Height based only:
4 height sensors used and one tank pressure sender.
• Height based with pressure monitoring:
4 height sensors used, 4 bag sensors used, and optionally one tank pressure sender.
• Pressure based only, 4 bag:
4 pressure sensors used and optionally one tank pressure sender.
• Pressure based only, 3 bag (2 front and 1 rear):
3 pressure sensors used and optionally one tank pressure sender.
The right rear sensor input and relay outputs should not be used.
• Pressure based only, 2 bag (1 front and 1 rear):
2 pressure sensors used and optionally one tank pressure sender.
The right front and right rear sensor input and relay outputs should not be used.
• Pressure based only, 2 bag (1 left and 1 right):
2 pressure sensors used and optionally one tank pressure sender.
The left rear and right rear sensor input relay outputs should not be used.
Note: The bag pressure senders are 150 psi units and the tank sender is a 400 psi unit.
Sensor Installation
Pressure based (or both pressure/height)
The bag pressure senders need to be mounted in their desired location T’d into appropriate airline or
valve; make sure to thread them into a 1/8” NPT grounded fitting otherwise you will need to attach a ground
wire to the body of the sender. It is VERY IMPORTANT that the pressure senders ground through the threads
or there will be unstable readings, thread sealant should NOT be used unless there is an extra ground wire run
to the body of the sender
Height based (or both pressure/height):
Please refer to the manual accompanying the height based sensor.
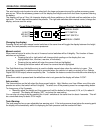
Once the height sensors are mounted, the cables will need to be routed up to the controller and
attached to the labeled terminals. To insert the wires into the terminals, strip about ¼” of insulation from the
end of the wire, push the button down on the top of the terminal, insert the wire, and release the button. Pull
on the wire gently to make sure it is seated tightly.
After the wires are attached, the next step is to program the sensor travel into the controller (Page 4).
Once that is done, the system is ready to operate.
The controller will automatically determine which mode to operate with depending on which sensors are
connected to it. The display will show “EE” for a sensor that is disconnected and “- -“ for a sensor that is
shorted to ground.