


128-8613
10 of 12
Page 10
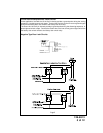
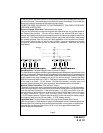
The Light Blue wire can be used to accommodate the following situations:
A. Shock Sensor By Pass:
B. Additional Ignition Output:
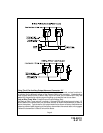
C. GM VATS Key Override:
Green w/ White trace Wire: Entry Illumination Ground Output
This wire provides a 30 second ground output (300 mA Max.) whenever the remote is
used to disarm the alarm or to unlock the doors and provides a continuous pulsed output
whenever the alarm is triggered. This wire should be connected to an external relay and
wired to the vehicles interior entry lighting whenever the optional Interior Illumination
circuit is desired.
Programming Tach Rate:
NOTE: All applications require that tach be programmed.
The unit will not operate unless tach is programmed. If an attempt is made to start the vehicle via
the remote start without first programming tach, the unit will flash the parking lights 7 times
indicating tach has not been learned and stored. If the tach rate is not properly programmed to
the specific vehicle, the unit may not realize that the vehicle is running in certain instances reengage
the starter motor.
The Remote Start Unit will learn the tach rate of most vehicle's single coil, multiple coil
packs, or single injector. To learn tach:
1. Turn the ignition key to the On position.
2. Press and release the valet/program push button switch 3 times.
3. Immediately turn the ignition key Off.
4. Press and hold the valet/program push button switch, then start the vehicle using the
key.
5. When the unit senses the tach signal, the parking lights will begin to flash.
6. Release the valet/program pushbutton switch. The parking lights will turn on for three
seconds to indicate that the learned tach signal is stored and the unit is out of the tach
learn mode.
NOTE: If the unit fails to learn tach rate due to an improper tachometer connection or a
poor tach source, the parking lights will not flash. To correct this situation, locate and
connect the Green/Orange wire to the proper tach signal, and then repeat the tach learn
routine.
Diagnostics:
Enter Bank 3 and turn on selectable feature # 7 as described in the feature selection and
setting section.
Exit the feature selection mode then press and hold the pushbutton valet/program switch
abd then turn the ignition switch to on position.
NOTE: Diagnostic mode is a temporary mode. Once you have accessed the diagnostic
mode, the unit will pause for two seconds then begin to flash the last stored shut down
code. This code will be displayed three times in succession, then the unit will automati-
cally exit the diagnostic mode.
The parking lights will flash a number of times indicating the reason for the last remote start
shutdown. The light flash indications are as follows:
1 Flash Run timer expired
2 Flashes Low or no tach signal (RPM)
3 Flashes Positive inhibit wire activation
5 Flashes RF shutdown signal received, or manual start trigger wire reactivated.
6 Flashes High tach signal (RPM)
7 Flashes Tach signal has not been learned
8 Flashes Negative inhibit wire activation