


Program mode allows you to adjust the settings and options of your system.
Your system has been intelligently designed by installers with years of experience. The system’s default settings
do not require any program changes in most cases. However, this system does incorporate a highly advanced
programming system that includes 4 menus with numerous options and settings that can be easily adjusted for
custom installations and applications.
User Settings - Page 8
This program menu contains settings that adjust the way the system operates for the user.
Additional Settings - Page 8
This program menu contains settings that control additional user options.
Starter Settings - Page 9
This menu controls features and settings associated with remote car starter applications.
Tach Settings - Page 10
This menu allows the programming of the tach signal and the manual adjustment of that setting.
Programming Overview
Entering Program Mode
Changing the Programmable Settings
1) Make sure ignition is in the off position.
2) Within three seconds turn the key ON - OFF - ON - OFF - ON. Leave in the “ON” position.
3) Press and release the Program Button on the antenna 1 time.
4) Park lights will come on and the horn (optional) will honk to confirm entering Program Mode.
5) Select Desired Program Menu by the following:
Press Button #1 Lock User Options Page 8
Press Button #2 Unlock Additional Options Page 8
Press Button #3 Start Remote Start Options Page 9
Press Button #4 Aux Tach Adjustment Menu Page 10
6) The selected mode will be confirmed by a horn honk (if connected)and one park light flash.
7) The Program Menu may be changed at any time by pressing the transmitter buttons as above, this allows
the installer to change a setting from one menu, then quickly jump to another menu and change another
setting without re-entering the Program Mode.
8) Turning off the ignition or 30 seconds of no activity will exit the Program Mode. This will be confirmed by 1
long horn honk and park light flash.
Note: If unit does not enter Program Mode, turn ignition off for 5 seconds and repeat steps 1-4. ** The first
ignition(Blue)MUST be connected to the vehicle’s first ignition wire. If it is not connected
It will not be possible to enter the Program Modes.
1) Enter Program Mode.
2) Select the desired Program Menu. (See pages 8 - 10)
3) Press & release the Program Button the correct number of times to select the desired Program
Setting(as listed on pages 8 -10). The park lights will flash and the horn (optional) will honk to indicate the
current setting that is selected.
4) Hold the Program Button until the parking lights /horn confirm the selected setting. The park lights will
flash and the horn (optional) will honk to indicate the option selected within the setting.
5) Turn the ignition key “Off” to exit Program Mode.
Note: This procedure is listed in below each program setting on pages 8 - 10 of this manual.
1) Within 3 seconds turn the key ON-OFF-ON-OFF-ON (Leaving Key ON).
2) Press and release the Program Button.
3) The park lights will turn ON
4) Press the Program Button a second time and hold for 8 seconds until the park lights flash 3
Times and horn (Optional) honks 3 times.
System is now re-set to factory defaults.
Note: Reset to defaults does not delete the transmitters from memory.
SYSTEM RESET
6
7
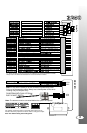
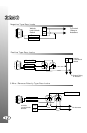
Yellow Starter Output Connect To The Vehicles Starter Wire.
Green Heater Output Connect To The Vehicles Accessory Wire.
Red 12 power Input Connect To Constant 12 Volt Power Source- High Current.
Red 12 power Input Connect To Constant 12 Volt Power Source- High Current.
Blue Ignition 1 Output Connect To The Vehicles Primary Ignition.
White Selectable Output Default Second Ignition Output. See Page 5.
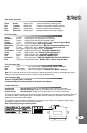
6 Pin Power Connector
14 Pin Power Connector
Manual Transmissions Only
Step 1 - Connect All Of the Following Wires
Black System Ground Connect To Chassis Ground.
Pink Brake Switch Connect To (+) When Brakes Applied.
White Park Light Connect To (+) Park Light System.
Green/White Hood Pin Connect To Hood Pin Switch.
Blue/White Tach Wire Connect To A/C Tach Source. Tach Models Only
Purple (+) Door Pin Connect to door pin on vehicles with (+) door pin systems.
Green (-) Door Pin Connect to door pin on vehicles with (-) door pin systems.
Black/White Park Brake Connect to Park brake switch. (-) when switch is applied.
Note: Manual Transmission units MUST be set into Reservation Mode to remote start.
See page 12 for details.
Your Basic Install Is Complete!
Your Basic Installation is Now Complete!!
NOTES:
1) If the unit does not start, check the starter is not in Tach Lock Out or in Program Mode.
2) If the vehicle still does not start, check all connections and check for factory security.
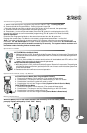
Step 2- Plug-In The Module
Step 3- Auto Tach Learn
1) Make all the required wire connections and plug-in the Unit.
**The park lights should flash twice upon power up.
2) Turn the Ignition Key ON. (Park Lights will turn on).
3) Start the vehicle, LED’s on antenna will come when proper tach signal is detected**, then after 30-35
seconds the park lights will turn off then flash twice to confirm tach learning.
* The system will flash the park lights seven times if not tach learned and the start button is
pressed. The system must be tach learned before remote starting.
** If the LED’s do not come on during tach learn, a proper tach signal was not detected
Note: If the park lights do not flash in auto tach learn mode it may be necessary to connect to a different tach
source. For best results connect the tach wire to the coil pack or to a fuel injector wire. See Page 8 for tach
adjustment.
***New - A system reset must be done before a new tach signal can be learned to the system.
When all the connections are done, the control module can be plugged in. Before connecting the control
module, make sure the ignition is in the OFF position. Plug in the 6 pin harness then the 14 pin followed by
any other connectors that were used.