


F
F - 2
PLUMBING
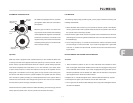
AUTOMATIC GAS REGULATOR
All models are equipped with an automatic
gas regulator. Both tanks are connected to
this regulator.
When the gas is turned on it is drawn from
only one tank at a time. When the tank being
used is depleted the regulator automatically
switches to the full tank. An indicator in the
regulator knob points toward the tank that
was being used to give you a visual reminder
when one tank is empty.
Operation
Make sure there is propane in both cylinders before you start. Rotate the black lever
on the top front side of the regulator toward the cylinder you want to use first. This will
be the “service” cylinder and the other will be the “reserve” cylinder. Slowly open both
tank valves completely, then close about 1/4 turn. This will allow you to easily check
to see if valves are open or closed. The indicator on the top of the regulator will turn
bright green. The indicator color will stay green as long as there is fuel coming from
the service side. When the service cylinder empties, the regulator will start drawing
from the reserve cylinder providing an uninterrupted fuel flow to the system. When it
switches over, the indicator color changes from green to red. This red color indicates
that the service cylinder is empty and needs to be filled.
Now disconnect the cylinder and have it refilled. After filling, reconnect the pig- tail and
slowly open the cylinder valve. The full cylinder now becomes the reserve.
LPG BOTTLES
The following step-by-step procedure gives you the proper method of removing and
installing these bottles:
1. Rotate the black lever all the way over towards the reserve cylinder. The indicator
will turn green and the reserve cylinder becomes the service cylinder. Now shut off
the cylinder valve on the empty cylinder.
2. Disconnect the green swivel nut from the cylinder valve at the bottle to be removed.
(This fitting has a common right hand thread and turns in the same direction to most
threaded fittings.)
3. Turn the large clamping “T”’ handle counterclockwise until the hold down bracket
is loose enough to remove the bottle. If your trailer is equipped with a gas bottle
cover the “T”’ handle must be removed, and then remove the cover before remov-
ing the bottle.
DO NOT REMOVE THE CENTER HOLD DOWN ROD!
To Install
1. Place the bottle in position on the “A” frame and bottle cross member so that it
rests on the upper collar of both bottles with the collar rims engaged in the grooves
on the underside of the bracket. If your trailer is equipped with a gas bottle cover it
should be positioned over the bottles next. Make sure the hold down rod projects
up through the hole in the shroud center bracket.
2. Replace the “T” handle and tighten down until the bottles are held firmly in place.
3. Hand-tighten the green nylon swivel nut onto the tank valve outlet.
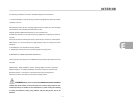
4. Turn on gas shut off valves and test all fittings with a soap suds or detergent solution
and watch for bubbles.
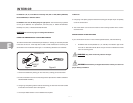
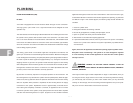
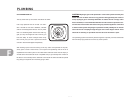
Change-Over
Leve
r
Inlet
High-Pressure
Regulator
Indicator
Window
Inlet
Second-Stag
e
Regulator
Outlet
Vent