


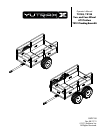


Owner's Manual
TX158, TX159 ATV Trailers
TX191 Tracking Beam Kit
Check for parts online at www.yutrax.com or call 800-345-6007 M-F 8-5 CST
Owner's Manual
TX158, TX159 ATV Trailers
TX191 Tracking Beam Kit
Check for parts online at www.yutrax.com or call 800-345-6007 M-F 8-5 CSTPage 2
WARNING
READ, UNDERSTAND AND FOLLOW ALL ASSEMBLY, IN
SPECTION, MAINTENANCE & USE INSTRUCTIONS PROVID
ED BEFORE EACH USE. FAILURE TO FOLLOW ALL WARN
INGS AND INSTRUCTIONS COULD RESULT IN SERIOUS
INJURY OR DEATH.
BE SURE TO FOLLOW ALL INSTRUCTIONS PROVIDED. IF
ANY INSTRUCTIONS ARE NOT UNDERSTOOD OR IF YOU
HAVE A PARTS ISSUE, CALL 8003456007 BEFORE USING.
THE WHEEL BEARINGS ARE NOT FACTORY GREASED.
YOU MUST GREASE THE BEARINGS BEFORE USE. CHECK
GREASE LEVEL FREQUENTLY TO PREVENT BEARINGS
FROM SEIZING.
DOUBLE CHECK THE ASSEMBLY OF YOUR TRAILER TO BE
SURE YOU ASSEMBLED IT CORRECTLY AND ALL NUT &
BOLT ASSEMBLIES ARE TIGHT BEFORE INITIAL USE.
BE SURE TO PERIODICALLY CHECK ALL NUT AND BOLTS
FOR TIGHTNESS. OVER TIME, NUTS AND BOLTS MAY BE
COME LOOSE FROM VIBRATION.
BE SURE TO ALWAYS HAVE THE CORRECT AMOUNT OF AIR
PRESSURE IN TIRES. THIS WILL HELP DETER FROM UNNEC
ESSARY WEAR AND/OR DAMAGE.
NEVER DRIVE ON HILLY TERRAIN EXCESSIVE WEIGHT
CAN CAUSE WEIGHT SHIFTS WHICH CAN LEAD TO LOSS OF
CONTROL OF YOUR ATV AND/OR ATV TRAILER.
DO NOT DRIVE IN EXCESS OF 10 MPH WHILE USING THIS
PRODUCT.
NEVER ALLOW PEOPLE OR ANIMALS TO RIDE IN THE ATV
TRAILER! IT IS NOT DESIGNED FOR THAT MATTER.
USE CAUTION NEAR TRAILER TILT LATCH. BE SURE LATCH
IS ENGAGED BEFORE EACH USE.
NEVER EXCEED THE MAXIMUM WEIGHT CAPACITY OF
1250 LB OF EVENLY DISTRIBUTED WEIGHT.
YUTRAX™ offers a full line of ATV accessories. We appreciate
your purchase of our world class ATV Trailers. Follow these few
simple instructions and your product will be sure to give you
many years of trouble free pleasure. Instructions should be kept
in a safe place and reviewed at least annually.
If for any reason you have a problem with your product, DO
NOT return to the retailer; contact the YUTRAX™ customer
service department Monday through Friday from 8 a.m. to 5
p.m. at 800-345-6007 for assistance.
ASSEMBLY INSTRUCTIONS:
Tools needed -- two 7/16” wrenches, two 1/2” wrenches, 3/4”
socket with ratchet & extension, needle nose pliers and a grease
gun with fitting.
IMPORTANT ASSEMBLY TIP: Do not tighten any nut and
bolt combinations completely until all parts are assembled
together! Finger tighten plus one turn of a wrench only!
This will temporarily hold the lock nut on the bolt while
helping alignment of all parts! After all parts are assembled
together, all nut & bolt combinations must be completely
tightened.
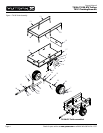
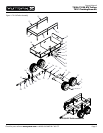
1. Insert rear tongue tube (TK81) to the welded-on “U”-bracket
located on the axle tube (TK80) using (1) provided 5/16-18 x
2-3/4” bolt, nyloc nut and 5/16” washer. SEE FIGURE 1 OR 2.
2. Insert the front hitch tongue (TK85) and the rear hitch tongue
(TK87) into the connector pocket (TK89) and secure using (2)
provided 5/16-18 x 2-1/4” bolts and nyloc nuts. SEE FIGURE
1 OR 2.
3. Attach the assembled hitch tongue to the rear tongue tube
using (2) provided 5/16-18 x 4” bolts, nyloc nuts and (4) steel
washers. Be sure the entire tongue assembly is aligned before
tightening. SEE FIGURE 1 OR 2.
NOTE: Front tongue does not go inside rear tongue. Front
tongue bolts on top of rear tongue.
4. Slide the axle plate (300705) over the short end of axle
spindle (TK48). Thread the short end of axle spindle into the
axle tube until tight. Back off the axle spindle until holes are
aligned and secure using (1) provided 1/4-20 x 1-3/4” bolt and
nyloc nut. SEE FIGURE 1 OR 2. Repeat this step for the other
side.
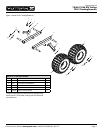
FOR TX158
5. Support the trailer far enough off the ground for the assem-
bly of the wheels. Slide the wheel onto the threaded axle
spindle with grease fitting facing outward. Secure in place
following this order: wheel, 3/4” washer, 3/4” crown nut and
cotter pin. Back crown nut off just enough so wheel spins
freely and crown nut slot aligns with hole in threaded axle
spindle. Insert cotter pin. Using a needle nose pliers, bend
cotter pin ears around so it will not come off the axle spindle.
Repeat this step for remaining wheel. SEE FIGURE 1.
IMPORTANT NOTE: You must grease the bearings of each
wheel. Using a grease gun, pump high-quality grease into
the bearings by attaching to grease fitting located on wheel
hub. Check the grease level frequently to prevent bearings
from seizing.