


Maintenance
51
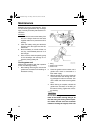
3. Loosen the bolt that retains the lock tab,
and remove the lock tab.
4. Loosen the bolt that secures the fuel filter
in place.
5. Loosen the ring nut of the filter cup.
6. Remove the filter cup, catching any
spilled fuel in a container.
7. Remove and inspect the filter element
and O-ring to make sure they are in good
condition. Replace them if necessary. If
any water is found in the fuel, the
Yamaha portable fuel tank or other fuel
tanks should be checked and cleaned.
8. Reinstall the filter element in the filter
housing.
9. Reinsert the O-ring in its proper position,
screw the ring nut onto the filler housing
until the filter housing is lightly seated.
10. Tighten the ring nut approximately an ad-
ditional 1/4 turn until the ring nut is tight.
Align one of the eight large ring nut tabs
into the slot of the locking tab. Install and
tighten the locking tab bolt.
11. Reinstall the fuel filter onto the filter
bracket by tightening the bolt.
12. Reinstall the fuel filter bracket onto the
engine by tightening the bolts.
13. Connect the water detection switch con-
nector, if equipped.
14. Run the engine and check the filter and
lines for leaks.
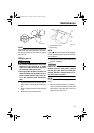
NOTE:
If any water is in the fuel, the red ring in the
fuel filter unit will float. If so, remove the cup
and drain the water.
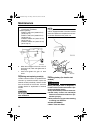
EMU29040
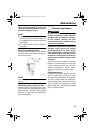
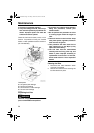
Inspecting idling speed
WARNING
EWM00450
● Do not touch or remove electrical parts
when starting or during operation.
● Keep hands, hair, and clothes away from
the flywheel and other rotating parts
while the engine is running.
● 2-hp models: The propeller rotates
whenever the engine is running. Do not
move the throttle control lever from the
start position during warm-up. The boat
could unexpectedly start to move, which
could result in an accident.
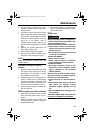
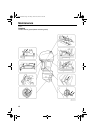
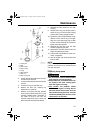
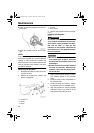
1. Locking tab
2. Bolts
3. Filter bracket
4. Filter housing
5. O-ring
6. Filter element
7. Filter cup
8. Filter cup ring nut
U69J14E0.book Page 51 Friday, March 12, 2004 10:20 AM