


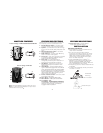

Windshield Mounting
• Install the two suction cups and rubber bumper
o
nto the bracket by fitting them into their holes.
•
Press the suction cups onto the windshield at the
location you have chosen.
I
mportant:
S
o
me newer cars have a plastic safety
c
oating on the inside of the windshield. The
w
indshield bracket may leave perm
anent marks on this
t
ype of surface. To
find out if your vehicle has this type
of windshield, check the vehicl’s owner’s manual or ask
y
our dealer. We recommend that you do not leave
t
he suction cup bracket on the window in direct
sunlight. If the detector is removed, this may cause
blistering of the dash in some vehicles.
• Slide the detector onto the bracket until it locks into
place.
• If necessary, the unit may be leveled by bending the
windshield bracket. Press the bracket release button
and remove the detector before bending.
Power Cord Connection
• Plug the small end of the power cord into the
unit’s power jack.
• Plug the large end into the vehicle’s cigarette lighter
socket.
N
N
o
o
t
t
e
e
:
:
Cord fits tightly into detector. When
installing the cord, expect some resistance.
Fuse Replacement
The lighter socket plug is equipped with a
replaceable 2 amp, 3AG fuse located behind the
silver tip. To replace the fuse, carefully unscrew the
tip of the plug.
I
I
m
m
p
p
o
o
r
r
t
t
a
a
n
n
t
t
:
:
Unscrew slowly. The tip contains a
spring which may fly out when disassembling.
Insert the new fuse with the spring and screw on
the tip. With use, screw cap on plug may loosen.
Retighten occasionally
.
INSTALLATION OPERATION
6
7
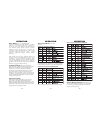
Power On Self T
est
Each time your Whistler detector is turned on,
an automatic self-test sequence confirms that
the speaker and visual displays are functional.
•
Text Display shows in order: (N/A on XTR-475)
1. WHISTLER 2. X-band 3. K-band 4. Ka-band
5. LASER 6
.
.
SR OFF 7. VG2 OFF 8. POP ON
9
.
B
SVR ON
1
0.
F
ILTER
(XTR-575/580/590)
11. HIGHWAY 11a. COMBO (XTR-575/580/590)
Dim/Dark Mode
Dim/Dark Mode reduces the illumination of the
display.
• Press the Dark button to reduce illumination
to a Dim setting.
• Press the Dark button a second time to
engage Dark Mode. The display illumination
is further reduced.
Dim or Dark Mode can be engaged during an
alert. In Dark Mode, the display goes dark for as
long as a signal is being detected and for 20
seconds after, then the display returns to the
dimmer setting.
• Press the Dark button a third time to restore
full illumination to the display.
Setting Saver
Setting Saver saves your personalized settings
so that when the detector is turned off and then
on again, you do not have to re-enter them.
Featur
e Engaged Confirmation
Each time a button is pressed, one beep confirms
feature “on”, two beeps confirm feature “off”.
Integrated Real Voice
®
(N/A on XTR-575)
When selected, Real Voice
®
will be used to articulate the
following:
1. Band Identification
2. Safety Warning System messages
3. Feature Selection
Note: In certain cases, the voice message does not
replicate the text message.
Quiet Mode
Quiet mode cancels audio during an alert and any new
alert within 20 seconds. After 20 seconds,
approximately 2 beeps are provided on any new alert
and unit then remains quiet.
• Press Quiet to cancel the audio.
• Press Quiet a second time during an alert to restore
the standard audio alert pattern; or turn the unit off,
then on.
Auto Quiet Mode
Auto Quiet mode reduces the selected audio level to
l
evel (1) approximately 5 seconds after a radar or safety
r
adar signal is detected. The alert for any new signal
w
ithin 20 seconds will resume at level (1). Auto Quiet
mode does not affect laser alerts.
• Press Quiet (before a signal is detected) to engage
Auto Quiet mode.
• Press Quiet (when the unit is not alarming) to
cancel Auto Quiet mode.
Audio Level Adjustment
To Change the audio level:
• Move Power/Volume button back to increase audio level.
• Move Power/Volume button forward to decrease
audio level. As audio level is adjusted, beeps are
provided and the display indicates volume level.
Self-test Mute (XTR-475 only)
Simply press the Quiet button during the self-test
sequence to cancel the self-test audio. This will not
effect radar/laser alerts. To restore the self-test audio,
simply press the Quiet button during the next self-test.
OPERATION
8