


higher, so it needs to rest after charging to measure actual state of charge.
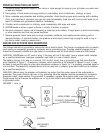
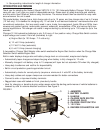
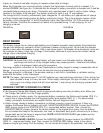
Below the Ammmeter is an incorrect polarity indicator that lights when incorrect polarity is sensed. It is
marked REVERSE. See figure 6a. It indicates that the charger to battery connection is reversed and it must be
reconected before charging can begin. This feature only operates when at least 4 volts or higher voltage
remains in the battery to be charged. This feature is active for both 6 and 12 volt batteries.
The charger’s built-in circuitry automatically taper charges the 12 volt battery as it approaches full charge
and then discontinues charging when the battery reaches full charge. This is the automatic feature. When
the battery is fully charged the 12 Volt FULL indicator lights. See Figure 6B the 12V FULL indicator and
Polarity indicator. Note that the automatic off feature only operates during 12 volt charging; six volt
charging is manual.
FIGURE 6a FIGURE 6b
CIRCUIT BREAKER
This battery charger has an internal self-resetting circuit breaker automatic reset protector that protects the
charger from temporary overloads. When it operates it makes a clicking sound. You will see the ammeter
reduce to zero when the breaker is open. After a cool-down period, the breaker will automatically close and
the ammeter will show a high rate of charge. If the breaker continues to cycle every few minutes, reduce
charge rate or discontinue charging.
PRE-CHARGE ACTIVATION
CAUTION: Be aware that a fully charged battery will also cause a low Ammeter reading. Attempting
pre-charge activation of a fully charged battery may cause explosion - make sure that battery
really is discharged, before using this procedure.
Pre-charge activation is the term for the time it takes before a battery begins to accept a measurable rate of
charge - it can be as long as 4-8 hours from the time the charging process begins.
Pre-charge activation is indicated if the ammeter reading is zero and a hydrometer or voltmeter reading
shows that the battery is fully discharged.
NOTE: The newer, high-calcium-type 12 Volt DC batteries may need pre-charge activation if their charge has
been allowed to drop to a very low level. When deeply discharged, this type of battery will provide
only a very low voltage output and will draw less than 1 amp during the recharging process, until
activated.
CHARGING IF BATTERY IS INSTALLED IN A VEHICLE
a) Set charger’s Charge Rate Selector switch to appropriate setting according to battery size. Make sure
the Charge/Start switch is in the Charge position.
b) Check polarity of battery posts - For top-mounted battery connectors, the Positive post (marked POS, P, +)
usually has a larger diameter than the Negative battery post (marked NEG, N, -). For side-mounted
battery connectors, the terminals are marked Positive -red and Negative -black.
c) Attach charger clamps to battery connections, as follows, ensuring a good connection (if there is a
mistake, the Reverse Polarity Indicator will light): NEGATIVE-GROUNDED VEHICLE: Connect the POSITIVE
(RED) charger clamp to the POSITIVE (POS, P, +) ungrounded battery terminal. Then, connect the
NEGATIVE (BLACK) charger clamp to the vehicle chassis, or the engine block (away from the battery).
Do not connect the clamp to the carburetor, fuel lines, or sheet-metal body parts: connect only to a heavy
gauge metal part of the frame or engine block.
NOTE: NEGATIVE-GROUNDED type systems are the
most common in today’s vehicles.
POSITIVE-GROUNDED VEHICLE: Connect the NEGATIVE (BLACK) charger clamp to the NEGATIVE
(NEG, N, -) ungrounded battery post. Then, connect the POSITIVE (RED) battery clamp to the vehicle
chassis or engine part (away from the battery). Do not connect the clamp to the carburetor, fuel lines, or
6