


8
•
There is a risk of explosive gases being released when batteries are charged or
discharged, failure to follow instructions may cause property damage, explosive
hazard, and/or personal injury.
•
Always use protective eyewear when using this product: contact with battery
acid may cause blindness and/or severe burns
•
Keep out of children’s reach.
•
ALWAYS store battery clamps in built-in storage well when not in use and never
touch battery clamps together, this can cause dangerous sparks, power arcing
and/or explosion.
FIRST AID
•
SKIN: If battery acid comes in contact with skin, rinse immediately with water,
then wash thoroughly with soap and water. If redness, pain, or irritation occurs,
seek immediate medical attention
•
EYES: If battery acid comes in contact with eyes, flush eyes immediately for a
minimum of 15 minutes and SEEK IMMEDIATE MEDICAL ATTENTION
3. CHARGING/RECHARGING
For maximum battery life, we recommend the VECTOR® system be kept fully
charged at all times. If the battery is allowed to remain in a discharged state,
battery life will be shortened.
NOTE: Recharging battery after each use will prolong battery life; frequent
discharges between recharges will reduce battery life
IMPORTANT:
•
MAKE SURE ALL SWITCHES ARE TURNED OFF DURING RECHARGING
•
Charge unit for full 24 hours using AC method, prior to first use
•
Recharge unit fully after each use
•
Recharge unit every two months, when it has not been used
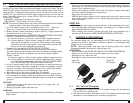
3.1 120 Volt AC Charging
1. Simply plug the AC plug of the AC/DC adapter/charger into any standard
120 volt AC wall outlet (figure A).
2. Plug the barrel connector attached to the AC/DC adapter into the small barrel
receptacle on the jump-starter that is marked recharge port.
7
2.1 EASY, STEP-BY-STEP JUMP-STARTING INSTRUCTIONS
This jump-starter is equipped with an automatic ON/OFF that only allows jump-start
energy to flow when proper connections are made to battery and frame. The auto-
matic ON/OFF works in conjunction with an audible reverse polarity alarm and a
large red LED. If inadvertent reverse polarity occurs, the alarm will sound and the
red LED will light. Disconnect the black clamp (negative clamp) first, then the red
clamp. Reconnect properly and a green LED will light. Wait one minute and then
turn the key. To recap:
CONNECT – Red clamp first, then black clamp.
DISCONNECT – Black clamp first, then red clamp.
NOTE: The automatic safety switch and polarity alarms require the vehicle battery
to have at least 2 volts when the clamps are connected
1. Turn OFF vehicle ignition and all accessories (radio, A/C, lights, cell
phone, etc.). Place vehicle in park and set the emergency brake.
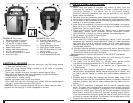
2. Remove booster clamps from storage location (Figure 1): simply squeeze the
handles and pull up on the clamp.
3. Procedure for jump-starting a NEGATIVE GROUNDED SYSTEM (NEGATIVE
BATTERY TERMINAL IS CONNECTED TO CHASSIS).
3a. Connect positive (+) red clamp to vehicle battery’s positive terminal.
3b. Connect negative (-) black clamp to chassis or a solid, non-moving,
metal vehicle component or body part. Never clamp directly to nega-
tive battery terminal or moving part. If the audible alarm sounds, the
polarity is not correct. Reverse the connections.
4. Procedure for jump-starting POSITIVE GROUND SYSTEMS
(NOTE: In the rare event that the vehicle to be started has a Positive
Grounded System (positive battery terminal is connected to chassis) replace
steps 3a and 3b above with steps 4a and 4b, then proceed to steps 5
through 7 below.
4a. Connect negative (-) black clamp to vehicle battery’s negative terminal
4b. Connect positive (+) red clamp to vehicle chassis or a solid, non-mov-
ing, metal vehicle component or body part. DO NOT CLAMP DIRECT-
LY TO POSITIVE BATTERY TERMINAL OR MOVING PART
5. A five (5) second delay is built into this jump-starter unit after the clamp con-
nections are made. This delay is designed to reduce the possibility of spark-
ing upon connection. We recommend waiting one (1) minute after making
the clamp connections prior to attempting to start vehicle.
6. Start vehicle (do not turn key for longer than 3-5 seconds).
7. After vehicle starts, remove clamps (disconnect the frame or engine clamp
first, followed by the battery cable) and replace them in the built-in storage
location. Squeeze the handles and slide the clamp into position and release
your grip.
CAUTION:
1. If engine fails to start, leave ignition key turned off. Try again later - the
engine may be flooded.
2. Recharge jump-start system after each use.
WARNING:
•
Always disconnect the engine or frame jumper clamp first; followed by the battery
jumper clamp
Figure 2A
AC charger
Figure 2B
DC charger