


27
Mercury Mountaineer
See Ford Explorer Instructions.
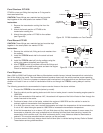
Mercury Mystique FIT401
CAUTION: These fittings are a matched set and must be kept together in the small plastic box marked FIT401.
Instructions
1. Remove the stock bolt, the fitting and the crush washers from the radiator.
2. Install the
T-TECH female half to the stock bolt and washers.
3. Install the T-TECH male half into the radiator using the white nylon gasket (supplied).
4. After T-TECH service is complete, remove the fittings and store in case FIT401, reinstall factory parts and
start the engine. Check for leaks and fluid quantity.
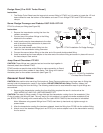
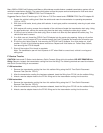
Mercury Sable FIT403
Note: Whenever using special fittings from FIT403 start them by hand and only tighten enough to prevent leaks.
FIT403 must be installed at the transmission in the Mercury Sable. Use the larger fitting in FIT403 (see Figure 54)
along with FIT321.
See
Ford Taurus and Windstar FIT403 Instructions.
General Motors
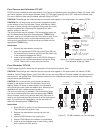
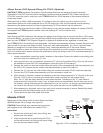
Special Fittings Kit FIT404 and FIT416 are to be used on any GM vehicle utilizing 3/8" “E” clip snap fittings.
This includes Blazers and Astro vans from the mid-90’s through all 2006 GM vehicles (except Allison equipped
vehicles, see pg. 28).
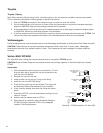
1. Locate a transmission cooler line where it attaches to the radiator. Remove the plastic cover, sliding back
onto the cooler line, exposing the “E” clip.
2. Using a small hook, awl or screwdriver, remove the “E” clip from the radiator fitting. (This clip will need to
be reinstalled to hold the FIT404/FIT416 male adapter in place during the ATF exchange.)
Note: An alternative is to use a T-TECH GM 3/8" Quick Disconnect Tool (Part No. FIT514) to disengage the
cooler line without removing the “E” clip, ensuring the clip is not damaged during installation.
3. Remove the cooler line from the radiator fitting and reinsert the “E” clip back onto the radiator fitting.
4. Insert the male fitting (FIT404 or FIT416, depending on your access requirements) until it engages in the
radiator fitting.
5. Connect a service adapter hose onto the T-TECH fitting and onto the transmission cooler line.
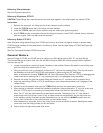
6. When service is complete, reverse the installation procedure. Always replace the “E” clip with a new one
(Part No. FIT510) prior to connecting the transmission cooler line back into the radiator fitting.
Note: The “E” clips are easily stretched or bent when removed. The design of the “E” clips utilizes 3
pressure points to hold a line in place. If any of these points are compromised, the line may come out
of the radiator, causing fluid leaks and the transmission to run low on fluid.
ALWAYS install a new clip
prior to final connection of the cooler line back into the radiator fitting.
7. After reassembly is complete, test on the cooler line to ensure connection is secure. Reinstall the plastic
cover back over the fitting to keep out dirt and debris.
8. Check vehicle for leaks and proper fluid levels.