


16
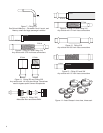
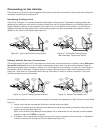
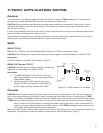
4. Examine the vehicle fittings and compare them to
the fitting chart on the back of the
T-TECH
cabinet door. In this case, a Chevrolet fitting is
required and a review of the fitting chart indicates
that FIT303 and FIT304 are the correct choices
(see Figure 44).
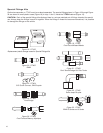
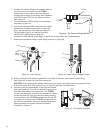
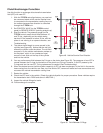
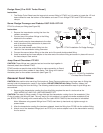
5. Connect the male FIT304 fitting into the radiator,
as shown in Figure 45.
6. Connect the female FIT303 fitting onto the vehicle
transmission cooling line as shown in Figure 45.
Note: The connections only need to be snug fit.
Torquing down hard is not required, but they
should still be tight enough to keep the
connections from leaking. If they begin to leak when service starts, see Troubleshooting.
7. Attach service adapter hoses to each fitting as shown in Figure 46.
8. Make certain the hose clamp is tightened on the inside of the hose clamp flare on each fitting
(see Figure 45) to keep the hose from coming off.
CAUTION: Over tightening the adapter hose clamps will destroy the hose ends over a period of time.
Clamp the hoses down with a snug fit only. If they still leak, see Troubleshooting.
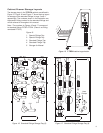
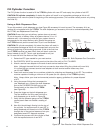
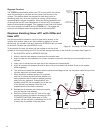
9. Connect a service hose adapter to each service transfer
hose (see Figure 47). You are not required to account for
fluid flow when making this connection. The
T-TECH
machine will sense the vehicle’s fluid direction and adjust
so that the used ATF from the vehicle is always coming
into the bottom of the
T-TECH cylinder and the new ATF
is moved out of the top of the T-TECH cylinder and into
the vehicle transmission. When the transfer hoses have
been connected, the system should look like the
illustration in Figure 47.
FIT304
FIT303
Hose
Clamp
Flare
RED
Figure 45. Insert Fittings
RED
BAND
Figure 46. Attach Service Adapter Hoses
T-TECH
FITTINGS
Service
Transfer
Hoses
Figure 47. Connection Complete
FIT304
Red Band
FIT303
RED
Figure 44. The Correct Fittings Selection