


26
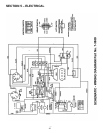
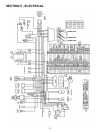
SECTION 4 – ADJUSTMENTS & REPAIRS
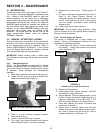
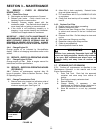
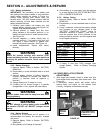
4.3.2. Battery Installation
IMPORTANT! The orientation of the battery and
the routing of the battery cables is very important.
Install battery carefully as shown in Figure 4.4.
Always install positive (red) cables using the
terminal cover. DO NOT operate machine until the
battery retaining rod has been installed and the
battery retained securely.
1. Carefully place battery into battery tray, and
replace battery retaining strap (see Figure 4.4).
Tighten strap hardware securely.
2. Connect positive (+) cables (red) first, from
wiring harness to the positive terminal (+) on
battery using bolt and nut. Install terminal cover.
See Figure 4.4
3. Connect negative (-) cables (black) last, to
negative terminal (-) on battery using bolt and
nut. Apply a small amount of grease over
terminals to prevent corrosion. See Figure 4.4.
4. Install seat/pedestal. Tighten seat knobs
securely.
WARNING
Shield the positive terminal with terminal cover
located on battery harness. This prevents metal from
touching the positive terminal, which could cause
sparks.
4.3.3. Battery Charging
1. Remove battery. Refer to Section “BATTERY
REMOVAL”.
2. Place battery in a well ventilated area on a level
surface.
3. Connect battery charger to battery terminals.
(Always remember to connect red cable to
positive (+) terminal, black to negative (-)
terminal.)
5. Charge battery at 6-10 amps for 1 hour.
6. If battery will not accept charge or is partially
charged after 1 hour, replace with new battery.
WARNING
Keep all sparks, flame and fire away from area when
charging battery.
WARNING
DO NOT attempt to charge battery while installed in
the machine. DO NOT use “BOOST” chargers on the
battery.
4.3.4. Battery Storage
If machine is to be stored out of season, it is
recommended the battery be removed, charged
and stored.
1. Remove battery. Refer to Section “BATTERY
REMOVAL”.
3. Bring battery to full charge (if required).
4. Store battery in an area away from the machine
on a wood surface. DO NOT STORE BATTERY
ON A CONCRETE SURFACE.
4.3.5. Battery Testing
1. Remove battery. Refer to Section “BATTERY
REMOVAL”.
2. Place battery in a well ventilated area on a level
surface.
3. Using a voltmeter, measure the battery voltage
and compare to the voltages listed in the
“BATTERY CONDITION CHART” below to
determine condition of battery. (Take care to
hook the positive lead of the voltmeter to the
battery’s positive terminal, and the negative lead
to the negative terminal.)
Batter
y
Condition Chart
State of Charge Digital Voltmeter
100% Charged w/
Sulfate Stop
12.80v
100% Charged 12.60v
75% Charged 12.40v
50% Charged 12.10v
25% Charged 11.90v
0% Charged Less than 11.80v
4. If battery is less than 100% charged, then
charge battery. Refer to Battery Charging
Section.
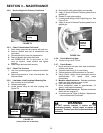
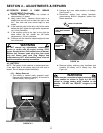
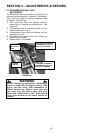
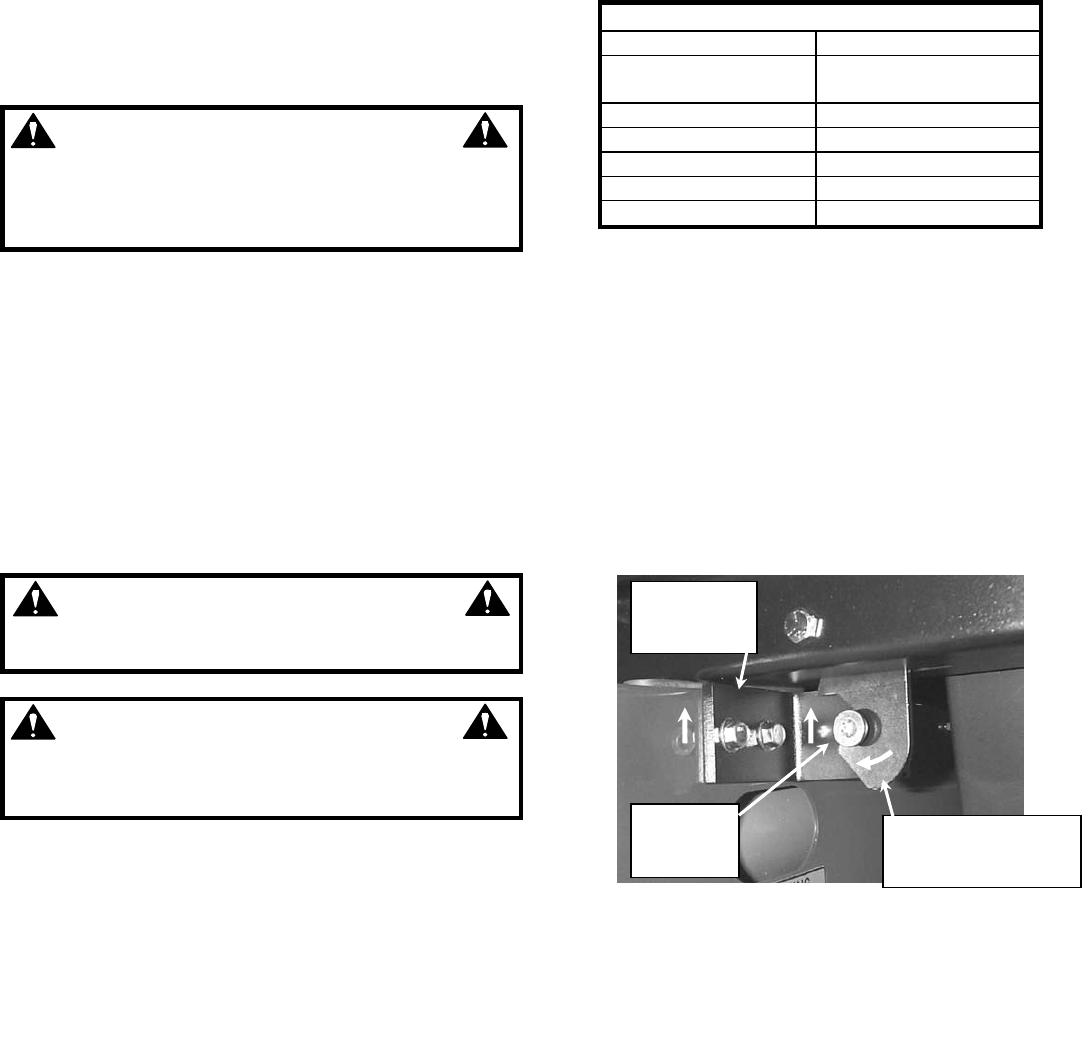
4.4 CARGO BED LATCH STRIKER
ADJUSTMENT
1. With cargo bed lowered, check to make sure that
both latches hook completely onto striker bolts. See
Figure 4.5.
2. If necessary, loosen striker bolt and/or striker
bracket bolts, and adjust up until latches hook
correctly. Retighten all hardware securely.
FIGURE 4.5
28
ADJUST
STRIKER
BRACKET
ADJUST
STRIKER
BOLT
LATCH MUST HOOK
COMPLETELY ONTO
STRIKER BOLT