


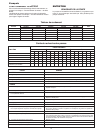

IMPORTANT
For best possible performance and continuous, satis-
factory operation, read these instructions before in-
stalling your new pump. Should service be required, this
manual can be a valuable guide, it should be kept near the
installation for ready reference.
INSTALLATION
LOCATION
Place unit as close to water source as possible to minimize
suction lift, obtain the best pumping performance, and aid in
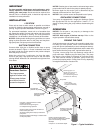
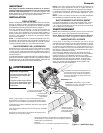
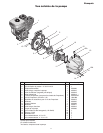
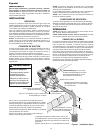
priming. A typical portable installation is shown in Figure 1.
For permanent installation, mount unit on a foundation that
will support the weight of pump and engine and also provide
stability while the pump is running. For most permanent
installations, it is advisable to bolt unit directly to foundation.
NOTICE: Settling and/or shifting during operation can cause
piping to place excessive strain on the pump and may dam-
age pump case. Set pump on hard level surface.
SUCTION CONNECTION
Connect either rigid pipe or flexible suction hose to pump
suction as shown in Figure 1. If hose is selected, hose must
be rated to hold the suction pressure and prevent collapse
while the pump is running.
Make the suction line a continuous rise from the water
source to the pump. High spots can trap air and also make
priming difficult. Make sure all connections are tight and free
of air leaks.
NOTICE: Suction pipe or hose must be at least as large as the
pump suction inlet in order for the pump to operate properly.
Minimum depth for the suction inlet is determined by the
diameter of the suction line. See Figure 1.
NOTICE: Use a suction screen to keep debris out of pump.
DISCHARGE CONNECTIONS
Your pump is equipped with a single port discharge. Select
the appropriate size for the application. Install a “T” as
shown to allow priming the pump without disconnecting the
piping.
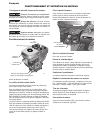
OPERATION
NOTICE: Do not start or run pump dry or damage to the
mechanical seal will result.
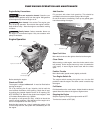
NOTICE: Add engine oil before startup. Refer to the
engine operation manual before startup.
PRIMING THE PUMP
A self priming pump only needs to be manually primed at the
first start-up. Once primed, under normal conditions the
pump will reprime automatically at each subsequent start-up.
If the pump is used in portable applications and the water has
been drained from the pump case, reprime before start-up
To prime, remove plug from top discharge outlet and fill
pump with water. Replace plug and start pump. The pump
will require a few minutes to evacuate air from the suction
line. After several minutes of operation, pump will be fully
primed and pumping water. Priming time will vary depending
on length and diameter of suction line.
2
Discharge pipe not
smaller than the pump
discharge opening.
(2" x 25' Discharge hose
included in kit FP2731)
Strainer or foot valve
(2" strainer included
in kit FP2735)
Provide rigid
platform for pump.
Example:
2" Pipe x 4 = 8" minimum depth.
Depth of suction inlet at least
four (4) times the diameter of suction
pipe to avoid forming vortexes.
Use pipe or reinforced hose to make
suction connection.
Hose must be strong enough to
not collapse during operation.
Suction screen area must be at least four
times suction pipe area.
Suction hose
(2" x 15' Suction hose
included in kit FP2735).
All suction piping must slope up toward the
pump inlet.
Support the piping and fittings to reduce strain
on the pump case.
Support pipe and
fittings.
Customer-supplied
Priming tee, plug
and nipple.
Priming Plug
25' Max
Pump Inlet
Figure 1 – Typical Installation
Hazardous Suction.
Can trap persons
against suction inlet.
Always use strainer
on suction hose to
prevent entrapment.