


• 6 •
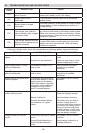
Battery Type Button
Use this button to set the type of battery to be charged.
Standard• – Set the button to 12V STANDARD or 6V STANDARD.
Deep-Cycle• – Set the button to 12V DEEP CYCLE.
AGM –• Set the button to 12V AGM/GEL.
GEL –• Set the button to 12V AGM/GEL.
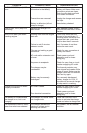
Charge Rate Button
Use this button to set the maximum charge rate.
2A Slow Charge Rate• – Intended for charging small batteries such as those
commonly used in garden tractors, snowmobiles and motorcycles.
12A Fast and 30A Rapid Charge Rate• – Use for charging automotive, marine and
deep-cycle batteries. Not intended for industrial applications.
80A Engine Start• – Provides 80 amps for cranking an engine with a weak or run
down battery. Always use in combination with a battery.
OPERATING INSTRUCTIONS11.
This battery charger must be properly assembled in accordance with
the assembly instructions before it is used.
The charger does not have an On/Off switch. The On and Off commands are controlled
by plugging the 71225 into a 120V AC electrical wall outlet only after the battery
connections have been made.
Charging
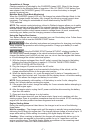
Ensure that all of the charger components are in place and in good working 1.
condition, for example, the plastic boots on the battery clips.
Connect the battery following the precautions listed in sections 6 and 7.2.
Connect the AC power, following the precautions listed in section 8.3.
Select the appropriate settings for your battery.4.
NOTE: This charger is equipped with an auto-start feature. It will not supply current to
the battery clips until a battery is properly connected. Meaning, the clips will not spark if
touched together.
Battery Connection Indicator
If the charger does not detect a properly connected battery, the CHECK (red) LED will
light. Charging will not begin if the CHECK (red) LED is on.
Automatic Charging Mode
When an Automatic Charge is performed, the charger switches to the Maintain Mode
(see below) automatically after the battery is charged. For a battery with a starting
voltage under 0.1 volt, the charger will not recognize that the battery is connected and
the CHECK (red) LED will stay lit. In order to charge the battery, use a manual charger
to pre-charge the battery for ve minutes to get additional voltage into the battery.
Aborted Charge
If charging cannot be completed normally, charging will abort. When charging aborts,
the charger’s output is shut off, the CHECK (red) LED will blink and the digital display
will show a failure code (see the TROUBLESHOOTING section for a description of the
failure codes). In that state, the charger ignores all buttons. To reset after an aborted
charge, unplug the charger, wait a few moments, then plug it back in.
Desulfation Mode
If the battery is left discharged for an extended period of time, it could become sulfated
and not accept a normal charge. If the charger detects a sulfated battery, the charger
will switch to a special mode of operation designed for such batteries. If successful,
normal charging will resume after the battery is desulfated. Desulfation could take 8 to
10 hours. If desulfation fails, charging will abort, the CHECK (red) LED will blink and the
digital display will show a failure code of F02 (bad battery).