


There will be screws behind where the ashtray/cubby came out, pop the seat heater/fan switches out, disconnect the
electrical connections on that panel and gently pull up on the end closest to the rear of the car. The panel will pop out.
Exercising great caution, disengage the wiring to the power lock switch, remove the panel and set it aside. Remove any
screws in the top of the console to gain clearance, and pry out the window switch pack and coin box. Twist the collar
around the ignition lock clockwise and pull upward to disengage it from the console cover. Disconnect the wiring to the
collar and set it aside. Move to the back seat. Pry upward and backward on the rear of the console to gain access to the
two remaining console cover screws. You may choose to disconnect the wiring for the rear lighter socket and rear heated
seat (if applicable), but it is not necessary for this procedure. Removing the rear cover exposes the last two screws that
hold the console cover onto its framework. Remove these two screws and remember which way that metal bracket ori-
ents itself to the hinge assembly. The device end of the cables can be fished through under the top of the console next to
the shifter and up through to the radio area. The iPod end of the cables can be fished through in the same manner in the
vicinity of the window switchpack. Once the iPod ends are through, pull them down towards the bottom of the center
armrest bin and with the rubber mat removed in said bin, pull the iPod ends of the cables through. Pull a reasonable
amount of cable into the storage bin, but make sure you have enough to reach the control box in the dash. Gently tuck
the remainder of the cables up and under the plastic top of the console and it will neatly fall into the center console. Re-
place the screws, window switches, coin box, shifter surround panel and ashtray.
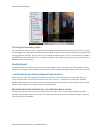
Step 4: Putting it all together
Once the cables have been run to the respective location, connect the DIN connector (the round one that says Belkin on
it) and audio cable to the AudioTroll. Gently press the new assembly downward and out of the way of the radio’s and
climate control unit’s space.
--CAUTION--
The locking tabs on the harness adapter’s male connector MUST be removed!
Damage will result if tabs are not removed.
Before refitting the cage into the fascia, refit the antenna lead, slide the radio into the cage and position the assembly
near the opening in the fascia. Insert the male connector from the harness adapter into the back of the radio unit. Slide
radio unit back into the dashboard.
Granite Embedded Systems
AudioTroll 9400/9600 Operation + Installation Manual