


107
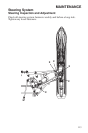
MAINTENANCE
Clutch System
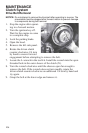
Drive Belt Installation
1. Drop the drive belt over the drive
clutch and pull back the slack. The
belt cord line should be flush with,
or slightly above, the outer cir-
cumference of the driven clutch
sheaves. The belt will seat itself in
the driven clutch during the break-
in period. Adjust the belt ride-out
after the break-in period by read-
justing belt deflection.
Tip: To ensure satisfactory belt life, install belts so they operate in the same
direction of rotation by positioning the identification numbers so that you
can read them. If required, separate the sheaves as outlined in the belt
removal procedures.
2. Rotate the L-wrench counter-clockwise to tighten the sheaves while
working the belt to the outer edge of the sheaves.
3. Remove the wrench.
4. Reinstall the side panel.
5. Close and secure the hood.
6. Break in the new belt. See page 73.
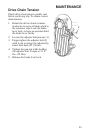
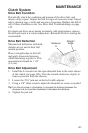
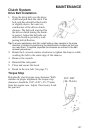
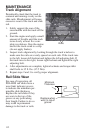
Torque Stop
Periodically check torque stop clearance. With
clutches in proper alignment, the torque stop
clearance should be .010”-.030” (.25-.75 mm)
from the engine case. Adjust if necessary. Lock
the jam nut.
.010”-.030”
(.25-.75 mm)