


EN
7
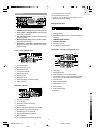
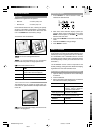
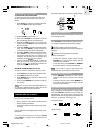
RF clock enabled:
RF clock disabled:
SET CLOCK
You only need to do this if you have disabled the radio-
controlled clock, or if you are too far from a RF signal.
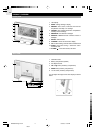
1. Press SELECT to navigate to the Clock Area.
will show next to the Area.
2. Press and hold MODE for 2 seconds.
NOTE
NOTE
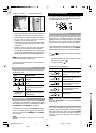
ALARM SOUND
The alarms can be set to sound either a beeping alarm or a
talking alarm. However, the sound you choose i.e. beeping
or talking will apply to both the Daily and Pre-Alarm.
The beeping alarm will beep for 2 minutes and get louder
and faster during this time.
The talking alarm will beep 4 times and then tell you the
time for 2 minutes in the selected language.
The talking alarm will only sound if the AC
adaptor is being used. If the adaptor is not plugged in,
the beeping alarm will sound.
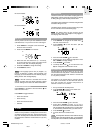
SET DAILY ALARM
1. Press SELECT to navigate to the Clock Area.
will show next to the Area.
2. Press ALARM /
to view the
alarm. (AL will
show at the top.)
NOTE
NOTE
3. Select the time zone offset hour (+ / -23 hours),
12 / 24 hour format, hour, minute, year, date / month
format, month, date, and display language.
4. Press UP or DOWN to change the setting.
5. Press MODE to confirm.
The language options are (E) English, (F)
French, (D) German, (I) Italian, and (S) Spanish. The
language you select determines the weekday display,
talking function and message display.
If the talk function is enabled then the talk
settings will follow after the display language. Please
see the "Talking Clock" section for further information.
SWITCH CLOCK DISPLAY
Press SELECT to navigate to the Clock Area.
will
show next to the Area.
Press MODE to toggle between:
• Clock with seconds
• Clock with day
• Clock with time-zone offset
• Calendar
ALARMS
This product has 2 alarms: The Daily Alarm and a Pre-
Alarm for snowy weather. The Daily Alarm can be set to
go off at the same time every day. The Pre-Alarm sounds
only when the Daily Alarm is activated and the recorded
temperature from Channel 1 sensor falls to 2°C (35.6°F)
or below.
3. Press and hold ALARM /
for 2 seconds.
4. Press UP or DOWN to select 15, 30, 45 or
60 minutes. This is the amount of time the Pre-Alarm
will sound BEFORE the Daily Alarm. The Pre-Alarm
is automatically activated when you select a time.
5. Press ALARM /
to confirm.
6.
shows when the Pre-Alarm is set.
The Daily Alarm will NOT function until the next day
if the Pre-Alarm has been triggered. Also, if you deactivate
the Daily Alarm, the Pre-Alarm is automatically deactivated.
3. Press and hold ALARM /
for 2 seconds.
4. Select the hour, minute, talking or beep alarm. Press
UP or DOWN to change settings.
5. Press ALARM /
to confirm.
6. The Beep Alarm icon
or the Talk Alarm icon
icon will appear when the alarm is set.
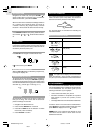
SET PRE-ALARM
The Pre-Alarm can be set to sound 15, 30, 45, or 60
minutes before the Daily Alarm. It will sound whenever
the recorded temperature from Channel 1 sensor falls
to 2°C (35.6°F) or below.
For example, if you set the alarm to 7:00 AM, and the
Pre-Alarm to 45 minutes, the Pre-Alarm will sound at
6:15 AM provided the outdoor temperature at
Channel 1 sensor is 2°C or below.
1. Set up and activate the Daily Alarm.
2. Press ALARM /
to switch to Pre-Alarm view.
(PRE-AL will show at the top.)
BAR933HG Eng R7 OP 8/20/04, 11:03 PM7
Black