


Operating Instructions and Owner’s ManualMr. Heater | Big Buddy
E-5
where the hose connector screws into the regulator and
at LP-gas supply cylinder. SEE WARNING! ON PLASTIC
DOORS.
• Depress and turn Control Knob counterclockwise to “PI-
LOT” position and hold down for 1 - 5 minutes. This may
take longer to purge air from the supply hose depend-
ing on the length of the hose being used.
• Depress and turn Control Knob counterclockwise to “PI-
LOT” position. Ignitor will spark to light the pilot burner.
(If needed, repeat these steps until pilot lights) and
continue to hold control knob down in “Pilot” position
for 30-60 seconds.
• After lighting pilot, release knob. Knob should return
to fully extended position. To operate heater slightly
depress knob and gently turn to lock in desired position.
• Turn control knob to “LO” or “MD” position to light
heater. Leave on “LO” or “MD” position until rst burner
tile has turned bright orange.
• After first burner tile has turned bright orange, adjust
heat output by turning Control Knob to desired position
(“LO”, “MD” or “HI” setting).
Caution: Do not try to adjust heating levels by using the
propane tank shut-off valve,
Warning:
DO NOT OPERATE HEATER UNLESS CONTROL KNOB IS LOCKED
IN A POSITION MARKED “HI”, “MD”, “LO”or “PILOT”. NEVER
SET CONTROL KNOB BETWEEN LOCKED POSITIONS. POOR
COMBUSTION AND HIGHER LEVELS OF CARBON MONOXIDE
MAY RESULT.
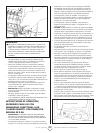
• Installation of 4 D-cell batteries is required for fan
operation. Battery box is located on lower back panel of
heater. Follow instructions on battery cover for correct
battery installation. See gure 2.
• Heater can also be powered by electrical adapter,
F276127. Required adapter to be 6 volt DC up to 800 mil-
liamp current with positive tip polarity. See gure 2.
• To shut off heater, shut off propane at supply tank, al-
low heater to use-up propane in supply line until heater
shuts off, then slightly push down and turn Control
Knob clockwise to “OFF” position.
• CAUTION: After turning heater off, wire guard will
remain hot. Allow to thoroughly cool before storing.
• When not in use, the gas must be turned off at the
LP-gas supply cylinder. As stated before allow heater
to use up propane in supply line until heater shuts off.
When the LP-gas supply cylinder is not disconnected
from the heater, the heater and the cylinder must be
stored outdoors, in a well ventilated space, out of reach
of children, and must not be stored in a building, garage
or any other enclosed area.
• Indoor storage of the heater is permissible only if the
cylinder is disconnected and removed from the heater.
Cylinders must be stored outdoors out of the reach of
children and must not be stored in a building, garage or
any other enclosed area.
MAINTENANCE:
Always keep the heater area clear and free from combustible
materials, gasoline and other flammable vapors and liquids.
Keep the vent areas (slots in the bottom and the top at the front
of heater) clear at all times.
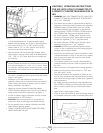
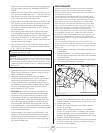
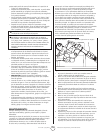
Visually inspect the pilot flame and burner periodically during
use. The pilot ame should be blue in color (not yellow) and will
extend beyond the thermocouple. The ame will surround the
thermocouple just below the tip, see Figure 3. A slight yellow
flame may occur where the pilot flame and main burner flame
meet. The burner(s) should be bright orange (with a slight blue
color around the border, a red-orange haze that is visible on the
ceramic tile is acceptable) and without a noticeable ame.
A blue flame that rolls out at the top of the ceramic tile indicates
an accumulation of dust, lint or spider webs inside the casing
assembly and main burner assembly. If the pilot is yellow or the
burner has a noticeable flame, cleaning may be required. Use
the following procedure to inspect the casing assembly and main
burner assembly.
It is necessary to periodically check the burner(s) orice and
burner venturi tube to make sure they are clear of insects/nests or
spider webs that may accumulate over time. A clogged tube can
lead to a fire.
1 Allow heater to thoroughly cool before performing any
maintenance.
2 Remove disposable 1 lb. cylinder(s) from heater or turn
OFF gas supply at remote cylinder valve, and disconnect
hose from heater.
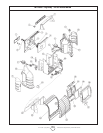
3 Remove wire guard from front of heater by gently bend-
ing to remove from holes in front cover.
4 Remove (4) screws securing back cover to heater. Lift up
slightly to release (2) plastic hooks on top of back cover.
5 Remove back cover.
6 Remove (3) screws attaching lower bafe to expose
burner air openings.
7 Inspect interior of casing assembly for accumulation
of dust, lint or spider webs. If necessary, clean interior
of casing assembly with a vacuum cleaner or apply air
pressure. Do not damage any components within casing
assembly when you are cleaning.
8 Inspect and clean main burner orifice located at bottom
of burner venturi tube, by using a vacuum or apply air
pressure at orifice opening.
Figure 3