


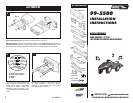

5
2
Disconnect the negative battery terminal to
prevent an accidental short circuit. Remove
(2) screws from the top edge of the dash trim
bezel. Pull out on the top of the bezel,
unhook the base and remove the bezel. If a
factory head unit is NOT present, scribe the
(4) mounting holes and radio opening onto
the bezel. Drill the holes, cut the opening
and place (4) U-clips over the mounting
positions.
1
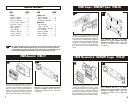
FORD Bronco / Pickup 1980-86
2
Disconnect the negative battery terminal to
prevent an accidental short circuit. Remove
(2) screws from the top edge of the dash trim
bezel. Remove the light switch knob,
cigarette lighter and ashtray. Unsnap the
black trim molding under the dash trim bezel
and remove (2) screws exposed. Remove
the bezel. Remove (4) screws securing the
factory head unit and disconnect the wiring.
FORD Bronco II / Ranger 1983-88
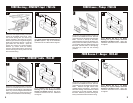
21
Disconnect the negative battery terminal to
prevent an accidental short circuit. Open
the console storage box and remove (4)
screws exposed in the bottom of the box.
Remove (2) screws securing the emergency
brake trim and remove the trim. Unclip the
gear shifter trim and remove. Open the
ashtray and remove (2) screws exposed.
Remove (4) screws under the ashtray
opening. Remove the console. Remove (3)
screws securing the factory head unit and
disconnect the wiring.
1
FORD Mustang / MERCURY Capri 1985-86
2
Disconnect the negative battery terminal to
prevent an accidental short circuit. Remove
(2) screws from the bottom of the radio trim
bezel. Pry out on the edges of the bezel and
remove. Remove (4) screws securing the
factory head unit and disconnect the wiring.
1
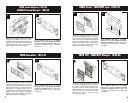
FORD Taurus / MERCURY Sable 1986-89
2
Mount Bracket #6 to the Radio Housing
with (2) 3/8" Phillips Flat-head Screws and
(2) Nuts supplied. Skip to the Installation
Instructions for ALL VEHICLES on Page #7.
Mount Bracket Set #7 to the Radio
Housing with (4) 3/8" Phillips Flat-head
Screws and (4) Nuts supplied. Skip to the
Installation Instructions for ALL VEHICLES
on Page #7.
Mount Bracket Set #5 to the Radio
Housing with (4) 3/8" Phillips Flat-head
Screws and (4) Nuts supplied. Skip to the
Installation Instructions for ALL VEHICLES
on Page #7.
Mount Bracket Set #1 to the Radio
Housing with (4) 3/8" Phillips Flat-head
Screws and (4) Nuts supplied. Skip to the
Installation Instructions for ALL VEHICLES
on Page #7.