


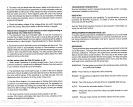
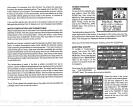

ALARM
-
Press this
key
to
activate
any
of the sonar alarms.
STOP
-
When this
key
is
pressed,
the chart
stops scrolling.
This doesn't
affect the
digital display,
however.
ARROW KEYS
-
These
keys
are used to make menu selections and to
move
objects
on the screen.
ON
-
The ON
key
turns the
X-55 on.
OFF
-
Press and HOLD the
Off
key
to turn the X-55 off.
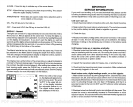
DISPLAY
-
General
The
lights
are turned on
for
approximately
ten seconds when the X-55 is
first turned on. Menus
appear
at the same time. To
keep
the
lights on,
press
the
key adjacent
to the
Light
label. It controls the
backlighting
used
on the
display
and
keyboard.
If
you
don't want the
lights on,
wait ten
seconds and the
lights
will
automatically
turn themselves off. The menus
will also
disappearafterten seconds,
oryou
can turn them off
by pressing
the CLEAR
key
at the
bottom of the screen.
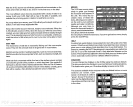
The Metric label at the
top
of the screen works the same
way.
Press
the
key adjacent
to the Metric label to
change
the
depth
from feet to meters.
This also
changes
the
temperature display
to
degrees Celsius, speed
to
knots,
and
log
to kilometers on the X-55.
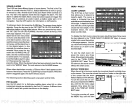
The
Display
menu at the bottom of the screen
lets
you adjust
the
display's
contrast forthe best
viewing angle. Pressing
the left arrow
key
decreases
the
contrast,
the
right
arrow increases it. After
setting
the contrast for the
best
viewing angle, press
the CLEAR
key
to erase the menu or wait
approximatelyten
seconds and itwill
automatically
erase.
Seethe
Display
Contrast section for more information on
this feature.
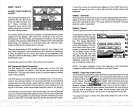
When the X-55 is first turned
on,
the
displaywill appearsimi-
lartothe one at left. The word
"AUTO"
in the
upper
left cor-
ner of the
display
indicates
the
automatic feature is on.
The
digital
bottom
depth
is
also
displayed
in this box.
IMPORTANT
SERVICE
INFORMATION!
If
your
unit is not
working,
or if
you
need technical
help, please
use the
following troubleshooting
section before
contacting
the
factory
customer
service
department.
It
may
save
you
the trouble of
returning your
unit.
Unit won't turn on:
1.
Check the
power
cable's connection at the unit. Also check the
wiring.
2. Make certain the
power
cable is wired
properly.
The red wire connects
to the
positive
battery
terminal,
black to
negative
or
ground.
3. Check the fuse.
4. Measure the
battery voltage
at the unit's
powerconnector.
It
should be
at least 11 volts. If it
isn't,
the
wiring
to the unit is
defective,
the
battery
terminals or
wiring
on the terminals are
corroded,
or the
battery
needs
charging.
Unit
freezes,
locks
up,
or
operates erratically:
1. Electrical noise from the boat's
motor,
trolling motor,
or an
accessory
may
be
interfering
with the sonar unit.
Re-routing
the
power
and
trans-
ducer cables
away
from other electrical
wiring
on the
boat
may help.
Route the sonar unit's
power
cable
directly
to the
battery
instead of
through
a fuse block or
ignition
switch
2.
Inspect
the transducer cable for
breaks, cuts,
or
pinched
wires.
3. Check both the transducer and
power
connectors. Make
certain both
are
securely plugged
in to the unit.
Weak bottom
echo, digital readings erratic,
or no fish
signals:
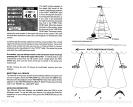
1. Make certain transducer is
pointing straight
down. Clean the
face of the
transducer.
Oil, dirt,
and fuel can cause a film to form on
the
transducer,
reducing
its effectiveness. If the transducer is mounted inside the
hull,
be
sure it is
shooting through only
one
layer
of
fiberglass
and that it is
securely
bonded to the hull. Do NOT use RN silicone rubber
adhesive
or Marinetex
2. Electrical noise from the boat's motor can interfere with the sonar.
This
causes the sonar to
automatically
increase its Discrimination
or noise
rejectionfeature.
Thiscan
causethe unitto
eliminateweakersignalssuch
as fish or even structure from the
display.
-o
12
29
35
3
4
33
PDF compression, OCR, web-optimization with CVISION's PdfCompressor