


Installation in a vehicle: Routing the cable
KPA-H2C Installation Guide
7
Installation in a vehicle: Mounting the antenna
KPA-H2C Installation Guide
6
8. Route the cable from the antenna to the vehicle’s interior by
tucking it underneath the rubber molding around rear window,
as shown below.
9. Route the cable from the lowest point of the rear win-
dow into the trunk. Take advantage of any existing
cable channels or wiring conduits.
• For SUVs, minvans & 5-door vehicles, bring the
cable into the vehicle under the rubber molding for
the tailgate, and continue under the interior trim
10. From the trunk, route the cable around the passenger
compartment and to the back of the cradle.
• Keep the wire away from areas where it could
become tangled in driver’s and passenger’s feet.
11. Plug the antenna into the back of the cradle
(see pg. 6, Step 1).
12. Plug the cigarette lighter adapter into the cigarette
lighter.
• KENWOOD RECOMMENDS UNPLUGGING THE
CIGARETTE LIGHTER ADAPTER AFTER YOU TURN
THE VEHICLE’S IGNITION OFF. (In some vehicles,
the cigarette lighter remains active after the
ignition has been turned off, and leaving
Here
2
Anywhere’s cigarette lighter adapter
plugged-into the cigarette lighter could drain the
vehicle’s battery.)
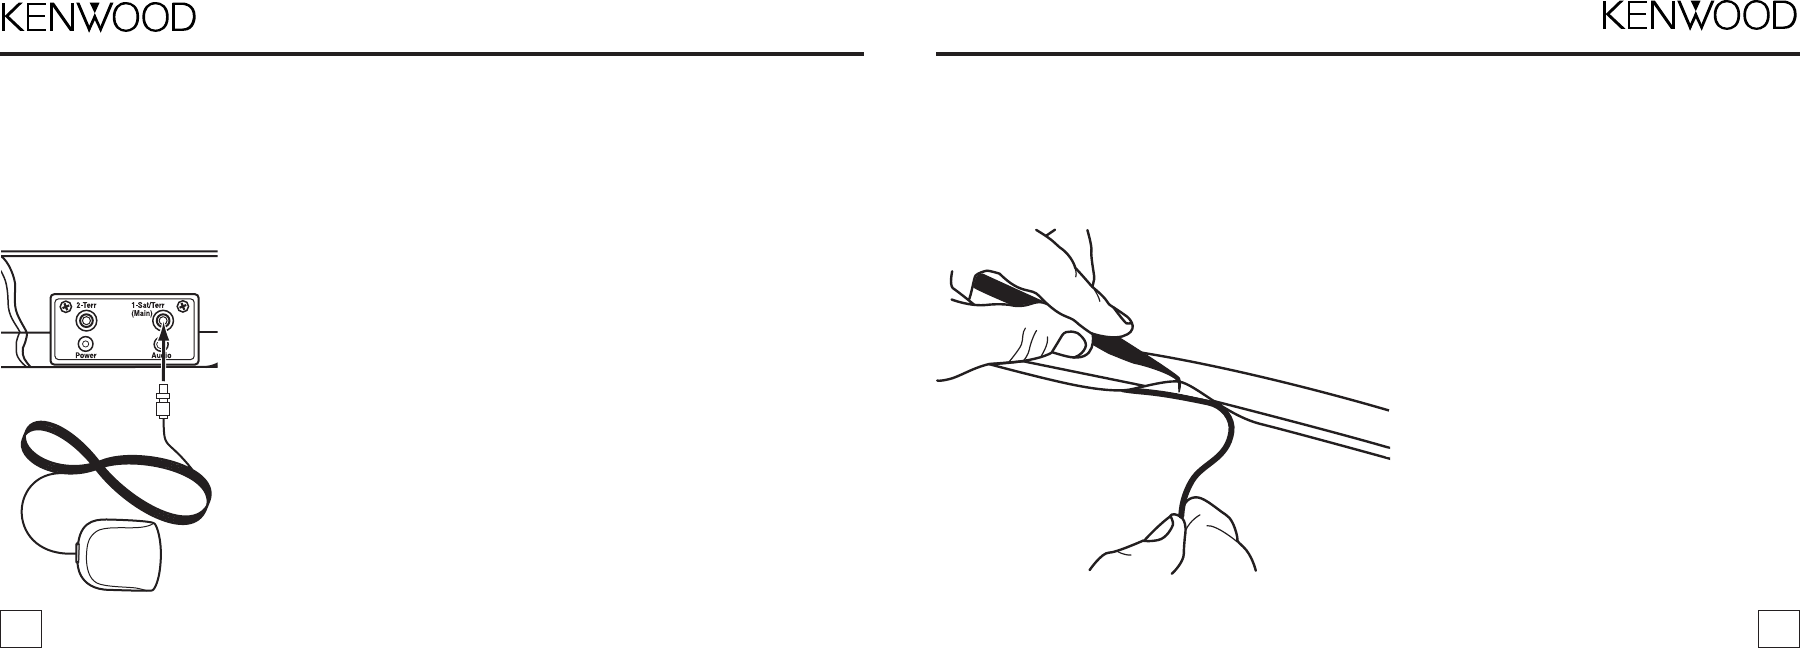
1. Temporarily plug the antenna
into the “1-Sat/Terr (Main)
connector on the back of the
cradle until it is firmly seated,
as shown.
Note: If you’re using the Kenwood CX-SR10 SIRIUS antenna, you’ll need to remove the plastic
housings from the antenna connectors—we recommend labeling the wires with their respective
colors. (See pg. 9, figure 16 of the CX-SR10 Installation Manual for details). Once you’ve
removed the housings, connect the wire that had the yellow connector to the connector on the
cradle labeled “1-Sat/Terr (Main)”, and connect the other one to the connector labeled “2-Terr”.
2. Find an antenna location on a metal surface at least 12” x 12”, and at least 6” from a window.
• Best reception is achieved with the antenna mounted on the roof; mounting on the trunk lid
will work for convertibles.
• If the vehicle has a roof rack or skid ribs, it may be necessary to mount the antenna off-center.
3.The antenna’s powerful magnet will secure it to the metal surface.
• Before routing the antenna cable, confirm that the antenna is mounted in a good location:
4. Temporarily plug the cigarette lighter adapter into the cigarette lighter.
5. Slide Here
2
Anywhere all the way into the cradle so that the connector at the rear of the unit
makes proper contact in the cradle. Press the POWER button to turn Here
2
Anywhere on.
6. Aim the remote control at Here
2
Anywhere, press the DIRECT button, then enter the number
“1-8-4”, and press the SELECT button. If your Here
2
Anywhere has been properly connected and
the antenna is receiving the SIRIUS signal you will hear audio. If you do not hear audio, the dis-
play will read “Acquiring Signal”. Re-orient the antenna until you hear audio. (See
Antenna
Signal
, on page 25 to use the ANTENNA SIGNAL screen to aim the antenna.)
• Make sure the vehicle is not in garage, or somewhere the satellite signal could be blocked
7. Turn Here
2
Anywhere’s power off and remove it from the cradle; unplug the cigarette lighter
adapter from the cigarette lighter; unplug the antenna from the cradle.