


2. Installation and Usage
2. Installation and Usage
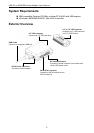
Follow the steps as follows to make the installation. You may connect single IDE
and/or SATA (serial ATA) hard drive to the adapter.
Connecting SATA Hard Drive
1. Connect the provided SATA cable to the SATA receptacle on your SATA hard
drive and the adapter.
2. Using the provided HDD power cable, connect the mini 4-pin end to the
adapter’s DC connector and the 15-pin SATA female power connector end to
the 15-pin power connector on the hard drive.
Note: If your SATA hard drive comes with a legacy 4-pin power connector, use
the 4-pin power connector instead. To connect to both IDE hard drive and
SATA hard drive with legacy 4-pin power connector, you need a 4-pin Y type
power cable to convert a single 4-pin power connector into a double 4-pin
power connector.
3. Connect the single DC output connector of the power adapter to the DC IN jack
on the adapter. Then connect the supplied power cord to the power adapter
and the other end to an AC outlet.
Connecting IDE Drive
1. Connect your 2.5” IDE device to the IDE connector of the adapter. To connect
to a 3.5” IDE hard drive or 5.25” CD/DVD drive, connect the 2.5" to 3.5" IDE
converter first.
2. If a 3.5” or 5.25” IDE device is connected, using the provided power cable,
connect the mini 4-pin end to the adapter’s DC connector and the big 4-pin
female end to the power connector on the IDE drive.
3. Connect the single DC output connector of the power adapter to the DC IN jack
on the adapter. Then connect the supplied power cord to the power adapter
and the other end to an AC outlet.
Caution: The adapter supports bus-power if only a 2.5” hard drive is connected.
However, USB port power output varies between computers. If your system cannot
detect the 2.5” hard drive, it could be that the USB port cannot supply sufficient
power, and thus additional power connection is required.
3