


Roll-Over Protective Structure and Safety Belts
Page 16 2007 HUV 4421 Gasoline and Diesel Vehicle Owner’s Manual
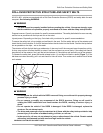
ý WARNING
• After inserting the tab, make sure the tab and buckle are locked and that the belt is not
twisted.
• Loose fitting safety belts could increase the chance of injury due to sliding under the belt if
sudden braking should occur. Keep the safety belt snug and positioned as low on the hip
bone as possible.
• Use a single safety belt for one person at a time. Do not use a single safety belt for two or
more people – this includes children.
• No more than one person per bucket seat at one time. No more than two persons per bench
seat at one time. Do not allow people to ride in any part of the vehicle that is not equipped with
a seat and a safety belt. Do not allow a passenger to hold a child in his or her lap while the
vehicle is moving.
• The Husqvarna vehicle is not designed to meet child seat compatibility requirements.
Children requiring a child safety seat must not ride on the vehicle. Comply with state and local
laws pertaining to child safety.
ý CAUTION
• Be careful not to damage the safety belt webbing or hardware.
• Inspect the safety belt system periodically. Check for cuts, fraying, and loose parts. Damaged
parts should be replaced immediately. Do not disassemble or modify the system.
• Keep safety belts clean and dry. If cleaning is necessary, use a mild soap and lukewarm water
solution. Do not use bleach, dye or abrasive cleaners as they may severely weaken the safety
belts.
• Do not insert coins, clip, etc. in the buckle as this may prevent the tab from locking into the
buckle properly.
• If the safety belt does not function normally, contact your Husqvarna dealer/distributor or
trained technician immediately. Do not occupy the seat until the safety belt is repaired.
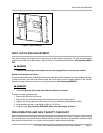
CARGO CAGE HEADRESTS
Vehicles Equipped with Cargo Cage Option
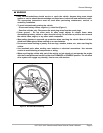
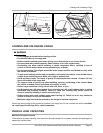
Some vehicles are equipped with a rear cargo cage. This cargo cage includes two adjustable headrests.
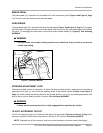
To adjust the headrests
1. Remove the headrest hardware (1) (Figure 8).
2. Raise or lower the headrest to the desired height.
3. Install the headrest hardware (1).
4. Hand-tighten the hardware until the headrest is securely attached to the cargo cage. See following
NOTE.
NOTE: Using tools to tighten the headrest hardware could result in overtightening. Overtightening the
headrest hardware could result in damage to the cargo cage structure and/or the hardware.