63-2483—2 4
ML6185
SPECIFICATIONS • INSTALLATION
DEVICE WEIGHT: 4.0 lb (1.82 kg).
NOISE RATING: (Driving only) 45 dBA maximum at
0.9m.
SPRING ROTATION: Clockwise (cw); counterclockwise
(ccw) by reverse mounting.
POSITION INDICATOR: Mounted on actuator hub.
ACTUATOR DESIGN LIFE:
Full Stroke Cycles: 60,000.
Repositions: 1,500,000.
Spring Return Cycles: 7,500.
APPROVALS:
UL94-5V: (Enclosure) Plenum rating.
UL873: (Line voltage auxiliary switches).
CSA: FILE NUMBER E4436, Guide Number XAPX.
ENVIRONMENTAL PROTECTION RATINGS: NEMA1
standard with damper shaft in horizontal position.
MOUNTING TAB: For use with Universal mounting bracket.
ACCESSORIES:
205820A 3-Point Mounting Kit.
205830A Crank-Arm Accessory.
205753 Hub Sleeve, 3/8 in.
205758 Hub Sleeve, 5/8 in.
Installation
WHEN INSTALLING THIS PRODUCT…
1. Read these instructions carefully. Failure to follow
them could damage the product or cause a hazardous
condition.
2. Check the ratings and description given in this specifi-
cation to make sure the product is suitable for your application.
3. Installer must be a trained, experienced service
technician.
4. After installation is complete, check out product op-
eration as provided in these instructions.
CAUTION
1. Disconnect power before installation to prevent
electrical shock or equipment damage.
2. Never turn motor output hub by hand or with a
wrench.
3. Do not install actuator in areas with acid fumes
or other deteriorating vapors that might attack
the metal parts of the actuator.
4. Do not install actuator in areas with escaping
gas or other explosive vapors that could be
ignited by a spark from the actuator or attached
accessories.
LOCATION
Install the actuator in any location free from acid fumes or
other deteriorating vapors that might attack the metal parts of
the actuator. Make sure the location is not subject to escaping
gas or other explosive vapors that could accidentally be
ignited by a spark from the actuator or its attached parts.
Install the actuator in a location that allows enough clear-
ance for mounting accessories and for servicing.
MOUNTING
The ML6185 Direct Coupled Actuator is designed to
operate a damper by driving the damper shaft either
cw or ccw depending on damper design. All
actuators are shipped in the fully closed position.
The ML6185 Direct Coupled Actuator is designed for
single-point mounting when using an adapter bracket. Single-
point mounting is typically used when the actuator is mounted
on the damper frame.
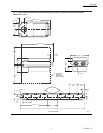
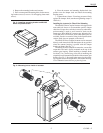
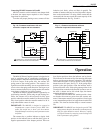
A mounting bracket (see Fig. 1) is provided with some
models to aid in installing the actuator. The bracket can be
bent to any shape to support the actuator at the correct
height.
The ML6185 Direct Coupled Actuator can also be three-
point mounted using the two front gear housing slots and
the adapter bracket. Secure two screws through the two
front gear housing slots and position the adapter bracket to
secure the rear of the actuator. Three point mounting is used
for foot mounting the actuator or internally mounting the
actuator in the duct, when direct shaft coupling is not
possible.
CAUTION
Do not use the actuator as a shaft bearing. The
actuator must be used only to supply rotational
torque. To prevent damage to the actuator, avoid
any side loads to the actuator output coupling
bearings.
PREPARATION
Before installing the ML6185 on the damper shaft,
determine the opening direction of the damper shaft to
determine the correct spring return rotation and correctly
connect the wiring. The ML6185 can be mounted to pro-
vide clockwise or counterclockwise spring return. Reverse
the actuator, if necessary, to provide the desired spring
action.
INSTALLATION
Installing the Actuator and Mounting Bracket (Single
Point Mounting)
When the direction of the damper shaft rotation is deter-
mined (either cw or ccw ), proceed as follows:
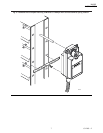
1. Place the ML6185 Direct Coupled Actuator over the
damper shaft.
2. Position the actuator for best access to the actuator
damper shaft locking screw.
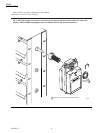
3. Install the mounting bracket (see Fig. 2) and adjust it
to support the actuator at the correct height. Mark the screw
holes for installing the mounting bracket on the damper
housing.


