


KK-K9-D14-K-INST-4-05
3
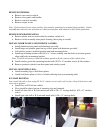
INSTALL CEILING AND WALLS:
• Install ceiling with ¼-20 x ½” carriage bolts and serrated
nuts.
• Install front wall with ¼-20 x ½” carriage bolts
• Install rear wall of K-9 unit with ¼-20 x ½” carriage bolts.
INSTALL TUNNELS & DOORS:
• Loosely attach side tunnels to main housing 1/4-20 x ½”
carriage bolts or 1/4-20 x ¾”carriage bolts depending on
location.
• Attach step to tunnel.
MAIN HOUSING FINAL STEPS:
• Mount rear housing use ¼-20 x 1-½” lag bolts.
• Tighten all loose bolts in the assembly.
Note: Look under the vehicle & insure there are no obstructions.
OPTIONAL FAN: If optional fan has been purchased, install at this time.
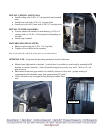
• Mount dome light switch as desired. A switch box is provided so switch can be mounted to K9
housing in various locations. (side of tunnel housing at top works very well). Wire to 12 volt
power source.
• Sheet metal seams and gaps need to be carefully silicone at floor area. (proper sealing of
compartment will eliminate water from getting under K-9 unit)
• Allow silicone to dry overnight before placing in rubber floor
mat.
Switch Box