


KK-K9-D14-K-INST-4-05
2
REMOVE INTERIOR:
• Remove rear seats in vehicle
• Remove door panels and handles
• Remove seat belt assembly
• Remove carpet in rear.
Note: If doors have electric door switches, they must be reattached to original plug assembly. Switch
assembly must then be wire tied down so it does not interfere with window or door latch operations.
REMOVE OEM DOOR PANELS:
• Remove plastic arm rest section that has window switch in it.
• Remove switch assembly from plastic housing (leave plug on switch)
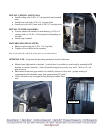
INSTALL DOOR PANELS AND WINDOW GAURDS:
• Install aluminum door panels with hardware provided
• Install hinge and window guard on top of door panel with hardware provided
• Lift window guard to installed position and mark mounting holes
• Install top mounting bracket with #10 x ½ “ screws, making sure that holes in window guards
align with holes in mounting bracket.
Note: It will be necessary to bend the window guards to fit the contour of the vehicle door.
• Install window guard into mounting bracket with 10/32 x ½” machine screws & flat washers.
•
Remove protective plastic from door panel and window guard.
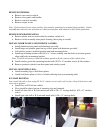
INSTALL MOUNTING LEGS:
• Attach mounting legs to hold down plates.
• Attach hold down plates to floor of vehicle utilizing front seat mounting studs
K-9 MAIN HOUSING:
Note: Install sidewalls to floor using #12 X 3/4” stainless screws until roof is in place. Keep all bolts loose until
entire unit is mounted
• Install floor of K-9 kit into vehicle
• Floor should be placed on top of mounting legs and centered.
• Install left side wall of K-9 unit and attach with ¼-20 x ½” carriage bolts & #12 x ¾” stainless
screws.
• Install right side wall of K-9 unit and attach with ¼-20 x ½” carriage bolts.