


SKU 94318 For technical questions, please call 1-800-444-3353 PAGE 6
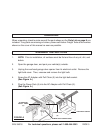
5. Screw the light bulb into the AC Adapter with Pull Chain (5). Then replace the
light bulb cover on the garage door opener, making sure the light bulb cover does
not touch the light bulb.
6. To attach the first Swivel Mount (1), peel off its protective paper backing and press
the Swivel Mount firmly against the top/forward side of the garage door light bulb
cover on the driver’s side (as far as possible from the garage door).
7. For a second vehicle, attach the second Swivel Mount (1) to the opposite top
corner of the light bulb cover (as far as possible from the garage door).
8. Plug the Cables (2) into the Power Pack’s (4) Connectors.
9. Plug the garage door opener into its electrical outlet. Then, pull the Chain on the
AC Adapter with Pull Chain (5) to the “ON” position to turn on the Light Bulb
Socket on the AC Adapter. The outlets on the adapter are powered whenever the
unit is attached to power.
10. Drive your vehicle(s) into the garage to the location(s) you will typically park each
time.
11. Activate the garage door opener, and the Laser Guided Parking System will emit
a bright, laser light beam. Adjust the Swivel Mount(s) so that the beams point to a
location on the dash or hood of the vehicle that you can easily see while driving.
NOTE: The Laser Guided Parking System will automatically shut off after about 3
minutes. If necessary, reactivate the garage door opener until you have finished
adjusting the laser light beams.
12. Sit in the driver’s seat to make sure you can easily see the laser light beam on the
dash or hood of the vehicle(s). If necessary, readjust the laser light beams.
This is now your point of reference for parking in the same location every time.
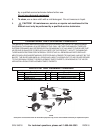
13. NOTE: If attaching the Swivel Mounts (1) to the
ceiling
of the garage, you may
need to install the Swivel Mounts farther forward to ensure the laser light beam
can be seen on the driver’s side dashboard when the vehicle is parked. To install
the Swivel Mounts on the ceiling, use the two Ceiling Mounting Screws (3) pro-
vided.